SPRING 2025 - I've just completed a WEBSITE REVAMP! Everything is still here but may be in a slightly different place where than you left it and there's also lots of new sections, so if you're having trouble finding something in particular or you spot something that's not working as it should, please do get in touch and I'll do my best to help!

Cricut Box Template Instructions
- Home
- SVG files
- Box Templates
- Cricut Box Template Instructions
Cricut box template instructions for setting up your gift box template correctly in Cricut Design Space - this may also be helpful for you even if you're using a non-Cricut cutting machine...
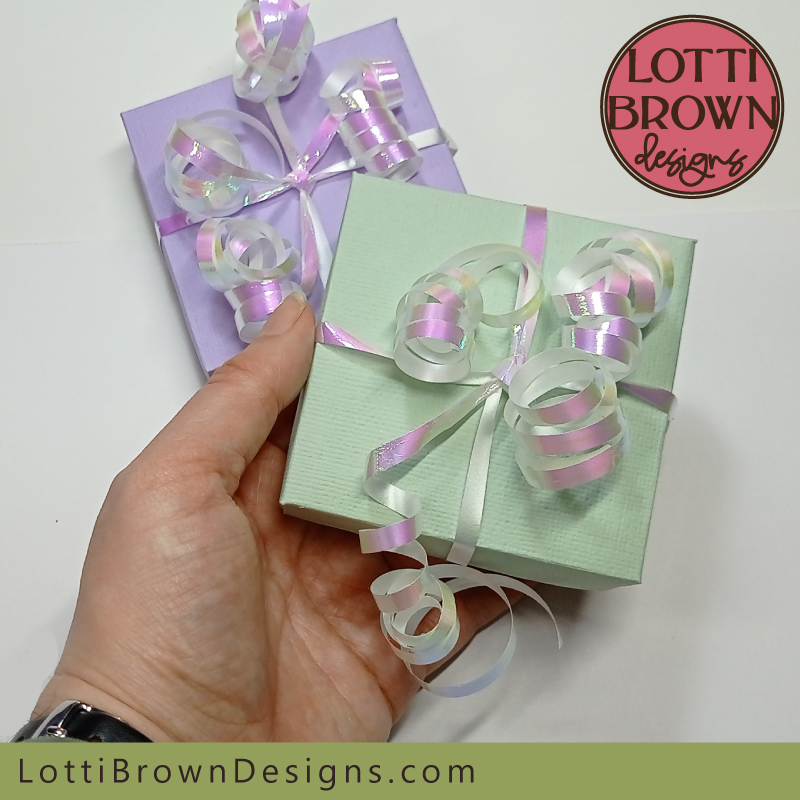 Cricut gift box templates
These are the instructions for you if you're making one of my cardstock gift box templates (from this page).
The box I'll be making on this page is the basic square gift box template - but all of the paper box templates use the same basic process and method, so they share the same instructions...
- This is part one of the complete instructions for making your gift box template, which covers how to set up the score lines correctly in Cricut Design Space. If you're using another make of cutting machine, you may also find the basic steps helpful to adapt to your own machine and design program, too.
- The second part of the complete instructions follows on from the bottom of this page (or find it here) and covers folding and assembling your gift box...
Gift Box Template Instructions for Cricut
If you would like to print these Cricut box template instructions, please use the 'Print' buttons on the page (top right of the page and at the bottom of the content).
This will create a print-friendly version for you and you can also deselect any parts of the page that you don't need to print.
For your gift box project you will need:
- Cardstock in two different colours. For making the basic square gift box at the size supplied in the SVG, you will need three sheets of A4 or Letter-sized cardstock (actually two and a bit)
- Glue stick (or similar paper glue that doesn't stick instantly so you have a bit of time to work with your cardstock)
- Magic tape (sometimes known as 'invisible tape') or similar - you only need this if you're making one of the templates with the patterned/cut-out lids
- Metal rule - or other hard straight edge to help you with your folding
- Cutting machine - or another way of cutting your project (I'm using a Cricut Maker)
- Scoring tool - if you prefer to score by hand, please delete the score lines and use a knitting needle or other blunt point to score the lines by hand (more info about that here)
- Florists ribbon and sharp scissors for cutting and curling the ribbon (optional)
- Gift box template - these instructions use this square box template - the instructions also cover the other box templates on this page
How to Set Up Your Cricut Box Template
These Cricut box template instructions use my basic square gift box template to show you how to set up the template in Cricut Design Space to get the score lines to score correctly. The other templates in my gift box collection also use the exact same method, so share the same instructions.
I'm using the SVG file in Cricut Design Space. If you're using another another file type, a different cutting machine program, or want to resize the PNG files, you can find the dimensions for the elements of the gift boxes here (you can also resize to any size you want).
If you're using these instructions for one of the box templates with a patterned lid, you will be able to see the pattern on one of your larger shapes (that will be the lid) - you will also have three smaller squares rather than two (or more if you're making the daisy box) - this makes no difference for the setting up covered in this part of the tutorial (and I'll share about it on the next tutorial) - so please just follow along with these instructions and you should have no difficulty.
If you're using these instructions for the gift card box template, you will have rectangles not squares and you will have three smaller shapes, plus extra lines for scoring and cutting that you'll be able to see at the top of the layer list. Please just scroll down until you reach the main large shapes (square/rectangle) and their associated score lines and go on and follow the instructions - and I'll prompt you to deal with the additional lines and shapes towards the end of the tutorial. If you're unsure, please check back to the gift card box page to see the image showing the extra parts to ignore while following this part of the instructions - but do remember to look out for the pale green box (like this) with special instructions for you later on this page.
1) Upload the gift box template and open it in Cricut Design Space - if you need help with this step, take a look on this page...
2) Before we start properly, I think it's a good idea just to take a look at the parts of the cut file, to get to know it a bit better.
The box template has four main parts - a lid and a base (large) and two or three smaller square inserts (depending on the template you're using). You will also be able to see the score lines. Look at these elements in the layers list down the right-hand side of the screen. You will be able to see that I've listed the score lines that go with the base and the lid above each of these in the list. Scroll down (on Cricut Design Space) to see the full list.
Usually, if you use a design from Cricut Design Space, it already has the score lines set up to score - but for uploaded designs (like this one), this is not yet possible - so we just need to take a couple of minutes to rectify that. Don't worry - it's not difficult at all and I'll guide you through it all...
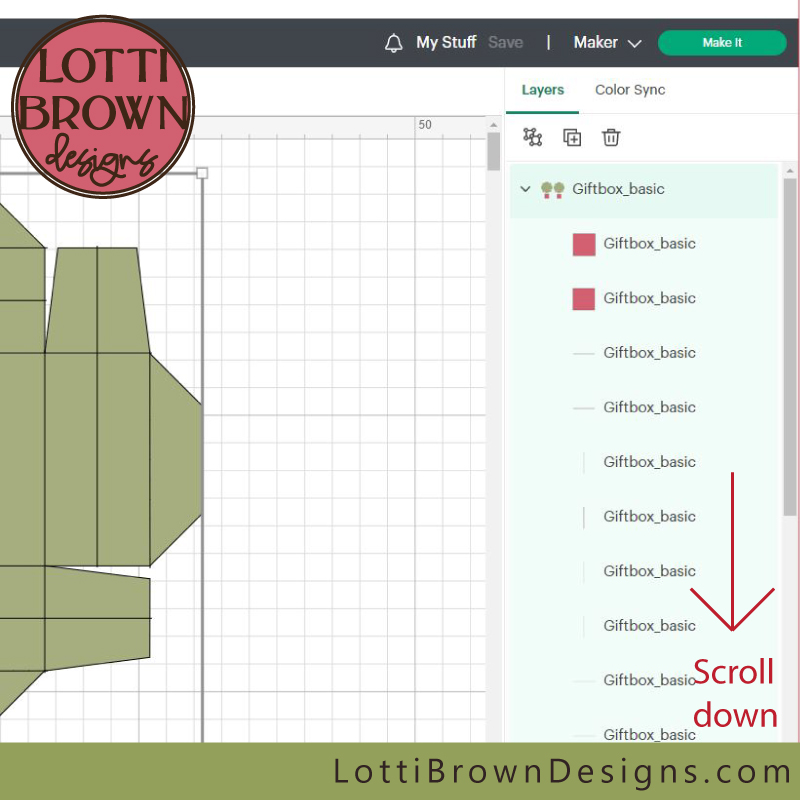 Scroll down so that you can see all the parts of the template in the (long) list
Resizing the Cricut box template
If you want to resize the Cricut box template, now is a good time - you can make it larger or smaller by grabbing one of the corners of the square surrounding the shapes with your mouse pointer - just click and drag to make it larger or smaller (first make sure that the 'Lock' padlock symbol is showing closed/locked to retain the proportions).
You can also change the format slightly if you want to make a different shaped box - in this case, click to 'Unlock' the padlock symbol (padlock is open) and pull the corner until you have it in the shape you prefer.
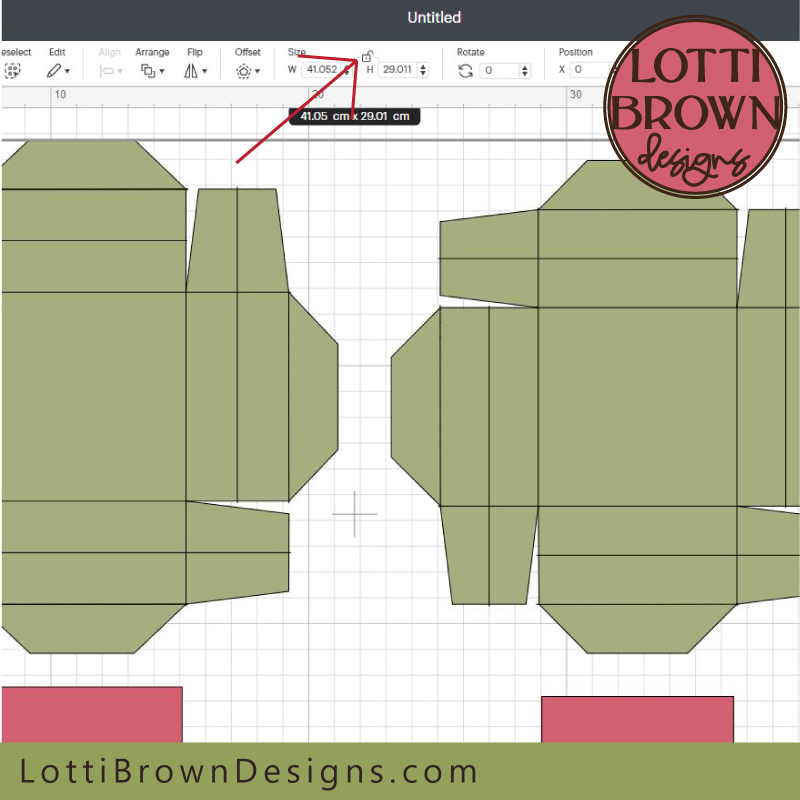 First check the lock or unlock proportions icon (padlock open or closed) before you resize the gift box template
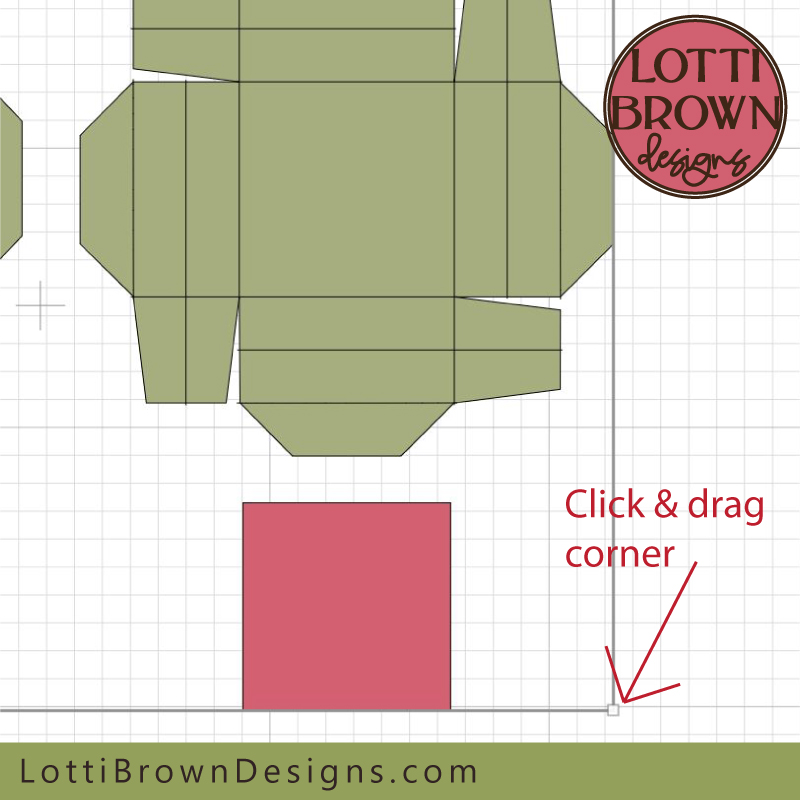 Resize the template by clicking and dragging from one of the corners
Using the basic square gift box template SVG as-is will make a finished box that's 8 x 8 x 2cm (3.15 x 3.15 x 0.79 inches) (see two smaller boxes in the image below). This cuts nicely onto two A4 or Letter-sized sheets of cardstock (plus a smaller third piece of cardstock for the inserts).
I also made a larger box (see the darker green box, in the image below) that cut on 30 x 30 cm cardstock (12 x 12 inches). This finished box turned out around 11.3 x 11.3 x 2.7 cm (4.44 x 4.44 x 1 inches) - this was allowing a fairly generous margin to the 30 x 30 cm (12 x 12 inches) cardstock size, so if you took it up to the edges you may be able to sneak a slightly larger box.
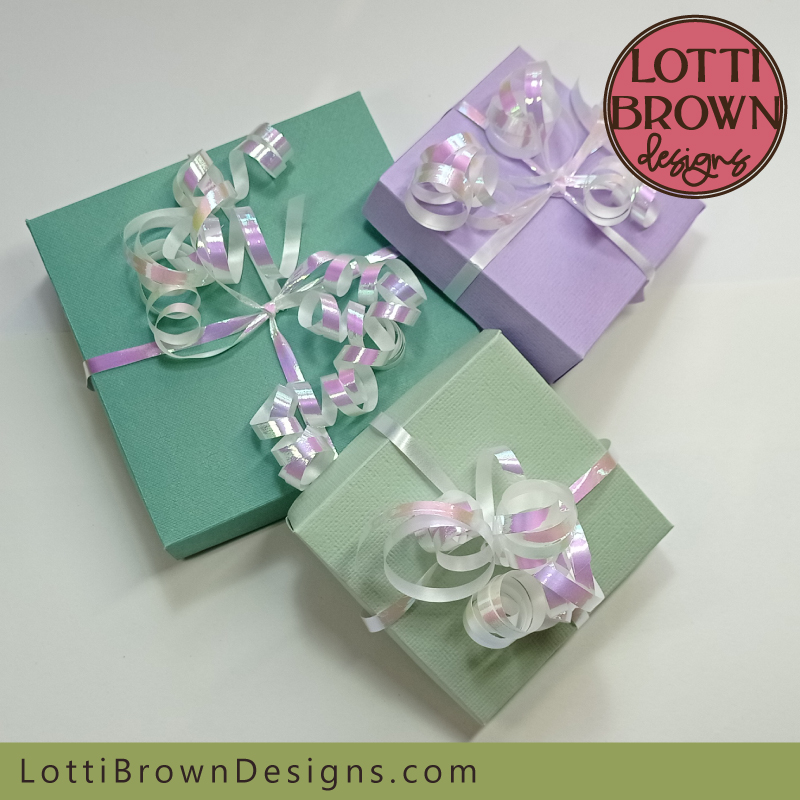 You can resize the gift box template to make a smaller or larger box - smaller boxes as supplied in the template
P.S. If you want an even bigger box, please upscale the base very slightly (or make the lid a little smaller) - the box is designed taking into account the thickness of the cardstock so that the lid will fit nicely on the base. If you make everything bigger, the gap between the base and lid will also get bigger (but the cardstock doesn't get thicker) - and the bigger you get, the bigger the gap gets - so once you get over the size that will fit on a 30 x 30 cm (12 x 12 inches) mat, you may prefer to scale up the base, just slightly, to reduce the gap and ensure a nicely snug fit for your lid.
3) IMPORTANT - Select 'Ungroup' - see the image below (this allows you to work with the different parts of the template)
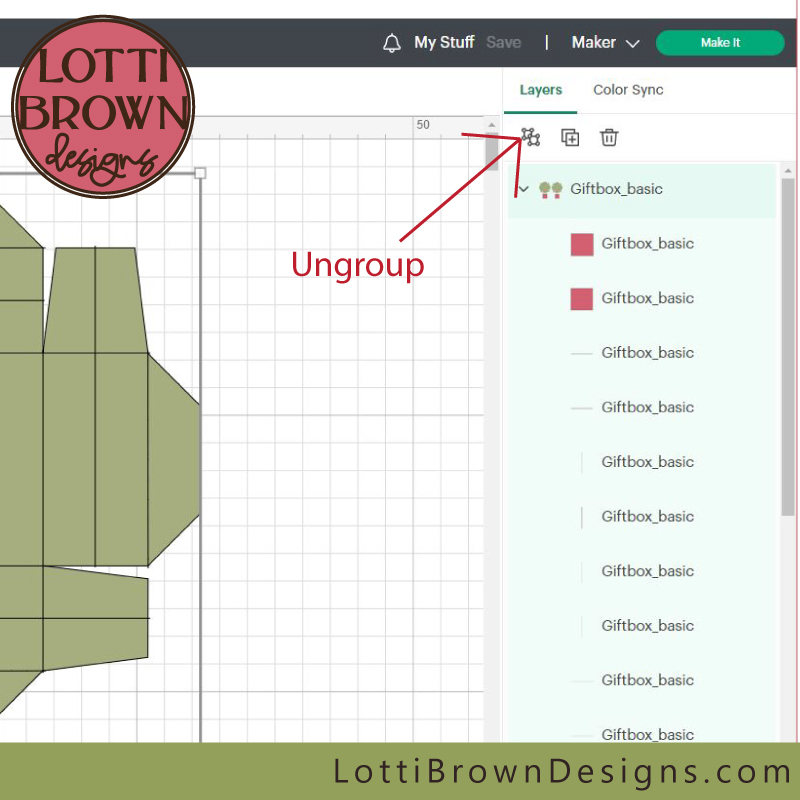 Select 'Ungroup'
4) Next, we're going to select all the score lines - as we need to change the function to 'score' rather than cut so that the Cricut knows to score these lines and not just cut them.
We can do this by clicking on each line in the list (while holding down the Shift key on your keyboard) - but this takes a while. I prefer to do this by selecting the lines we need with the mouse.
- Grab your mouse and click and drag to create a rectangle that covers both large square shapes - see the photo below*
*Apologies for the poor image but I had to try and do this one handed while selecting the area as I couldn't take a screen shot for this part!
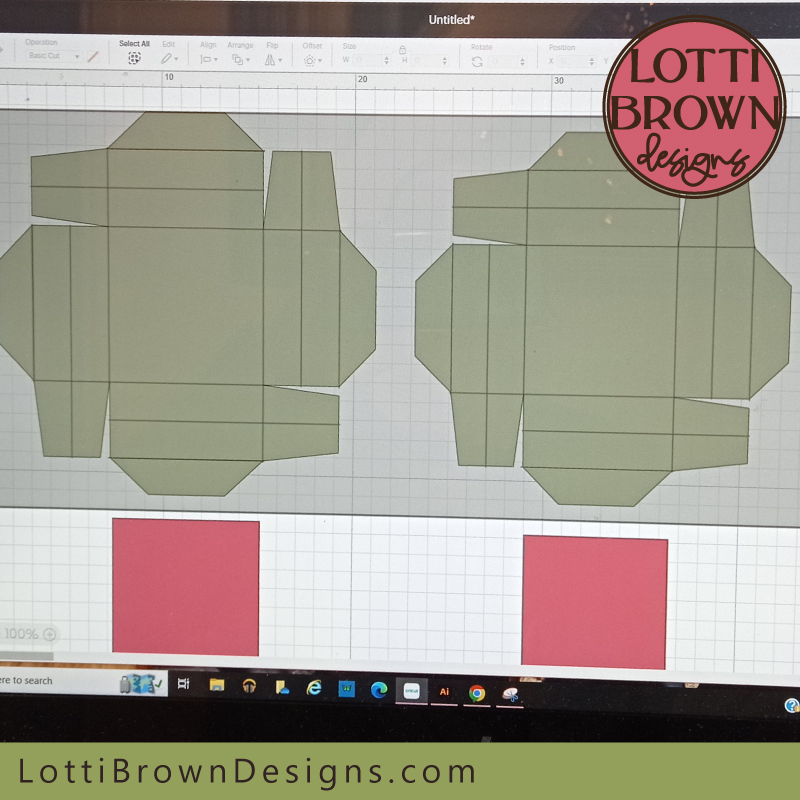 Selecting the two box parts on the template
The next bit is important, now...
- This has selected the two large square shapes, plus all the score lines. We only want the score lines, so we need to look down the list and deselect the two large squares. Look down the list on the right-hand side - the lines AND the large squares should all have turned a pale green...
- Hold down the 'Shift' key on your keyboard and then click on each of the two large squares in turn (then release Shift) - this should deselect the TWO large squares, leaving the score lines still selected (pale green). Check down the list to see if this is the case for you (see image below)...
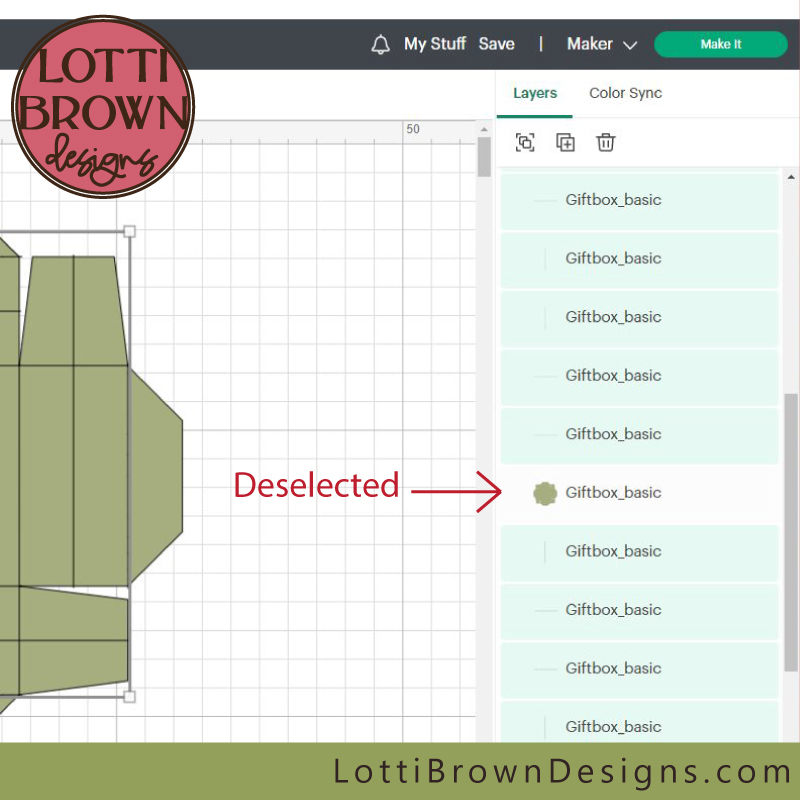 Select only the score lines on the template
5) Then (leaving the lines all selected, and the large square shapes unselected/deselected) click on the drop-down menu on the top left of the screen under 'Operation', and click on 'Score' to turn the lines into score lines - see image below...
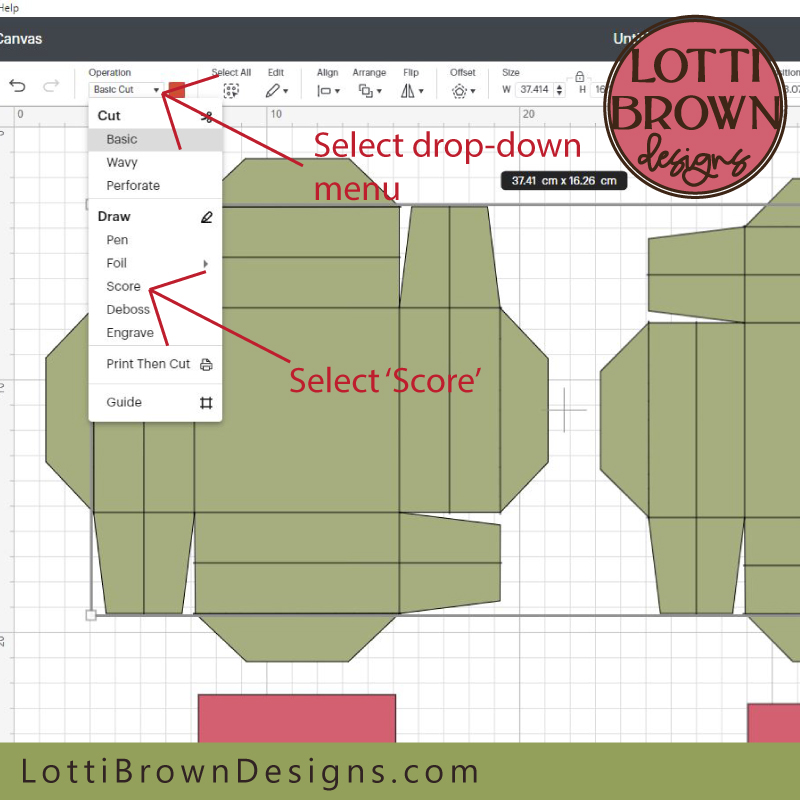 Select 'Score' from the drop-down menu to turn the lines into score lines
Let's just check that it all worked okay - take a look at the large squares - the inner lines should now all be dashed lines (denoting score) on both large squares and the outer edges of the large squares should still be solid lines - see the image below...
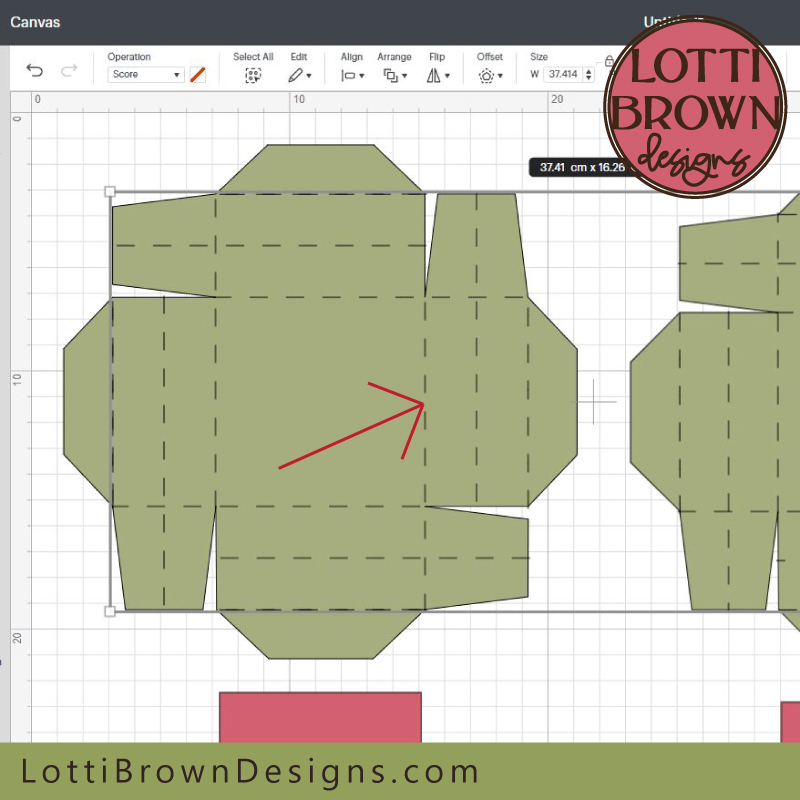 Take a moment to check that all of the score lines on each square shape turned dashed, denoting 'score' rather than 'cut'
6) Next, we're going to attach the score lines to the large square shapes so that the Cricut knows which parts the score lines belong with.
Again, we could do this by selecting down the list on the right-hand side individually, while holding down Shift on the keyboard. I find it much quicker to click and drag with the mouse to include one square at a time - see the image below*...
*Once again, apologies for the poor photo - trying to do it one-handed and screen shot not available for this - but hopefully, you'll get the idea!
 Click and drag with the mouse to select one large green square at a time, together with all its score lines
With your first square (and score lines) selected, check the list on the right-hand side, just to double-check that there is one large square, plus all the lines listed just above it (12 lines per square) that are selected (selected items are coloured pale green in the list)...
Then simply click on 'Attach' right at the bottom of the screen (right-hand side) to attach the lines to the square, so they now belong together (see image below)...
 Click on 'Attach' to join together the square with all its score lines
Let's just check it worked okay - take a look at the list - it should show that the score lines are attached to the first green square - with the paperclip symbol and 'Attach' wording at the top, and the items are all inset (see image below)...
March 2024 - after a Cricut update, the contents of each 'Attach' grouping will be hidden - click on the arrow next to the 'Attach' paperclip to see the contents of the grouping so that it looks like this!
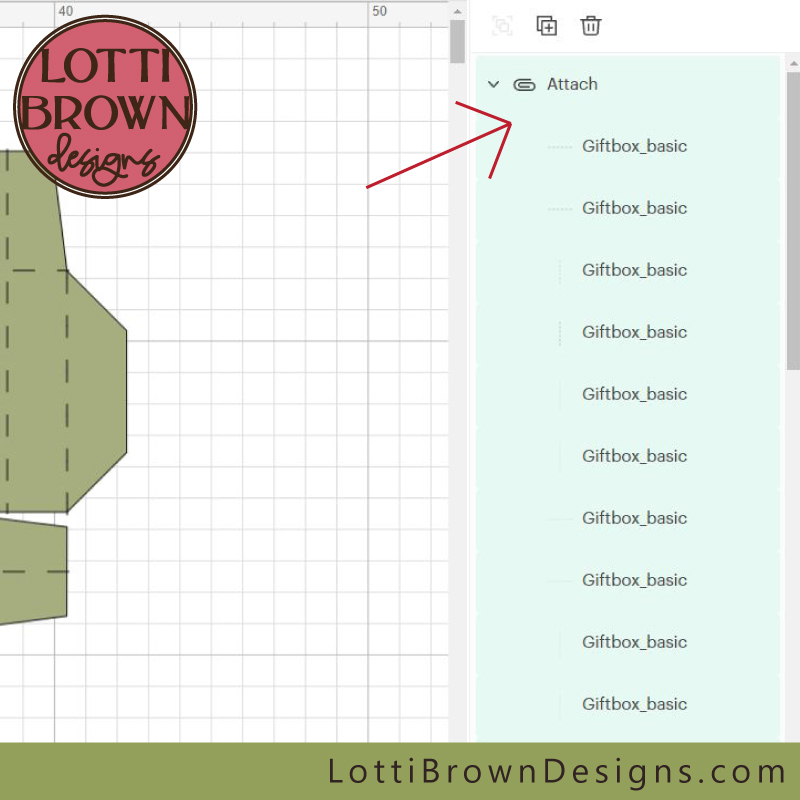 Check the list to make sure the 'attach' has worked okay
And scrolling down (see image below), we can see that the large square shape is included and all these attached items are inset from the ones below...
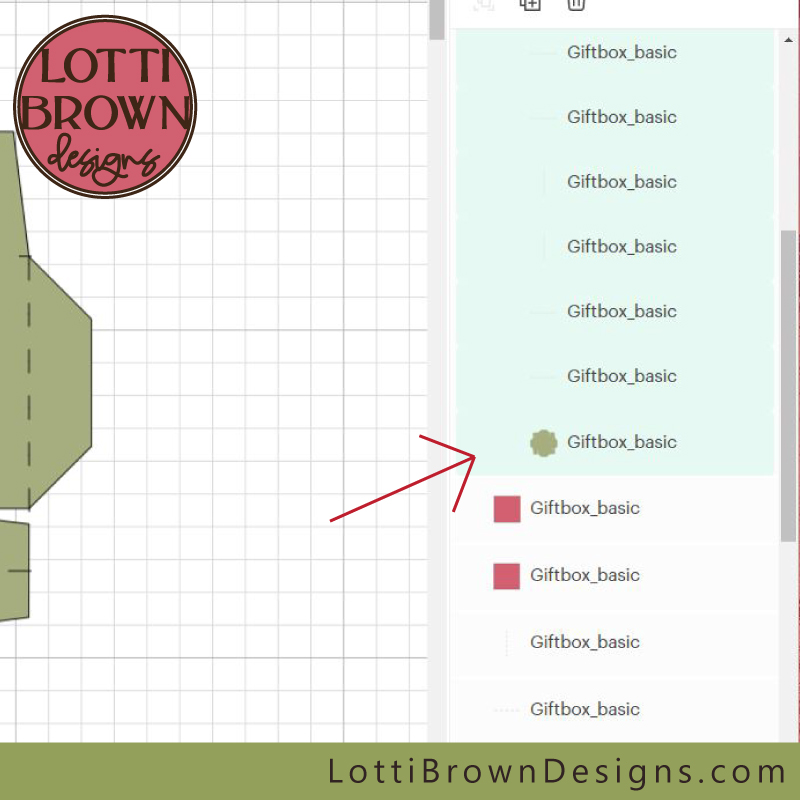 Check the green square is included and the list is inset from other items
7) Now, repeat this with the second large square:
- Click and drag with the mouse to select the second square and all its score lines
- Check the correct parts are selected in the list on the right-hand side
- Click 'Attach' to join the square and its score lines together
- Check everything is 'attached' together as it should be
When you've done, your list should look something like this - see the three images just below showing scrolling down the screen...
March 2024 update - click on the arrow next to the 'Attach' paperclip to see the contents of the grouping so that it looks like this!
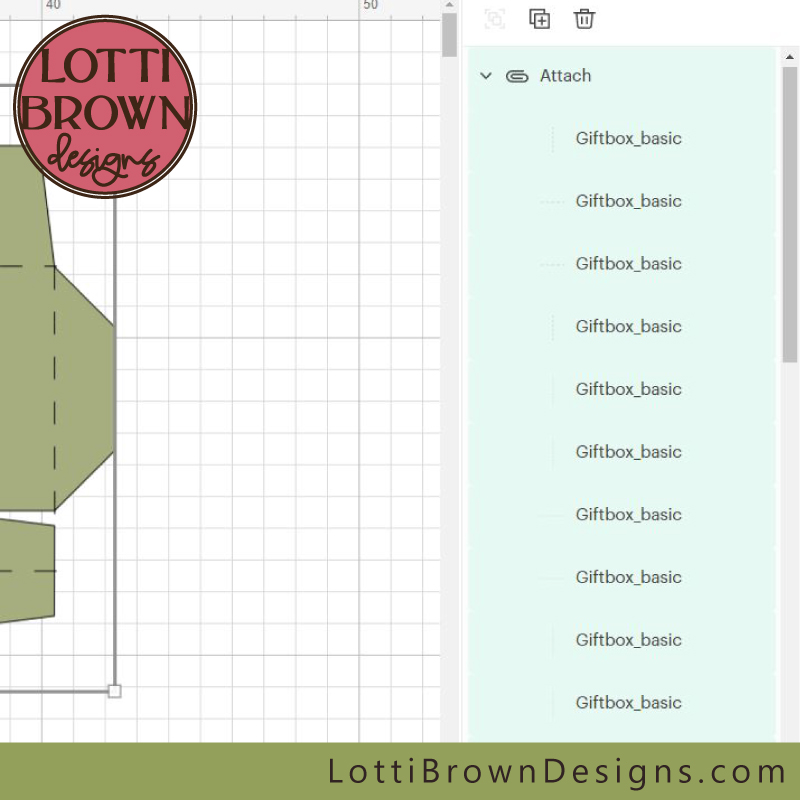 From the top of the list, the score lines are all attached and inset...
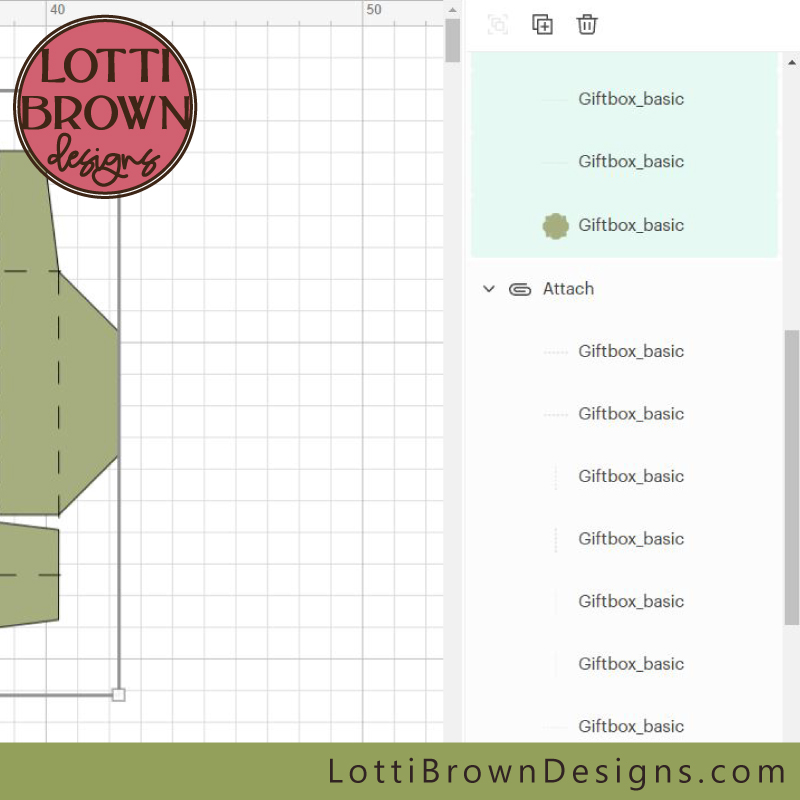 Score lines show as belonging to the green square shape just beneath. Then, there is another attached group with lines grouped together (keep scrolling)...
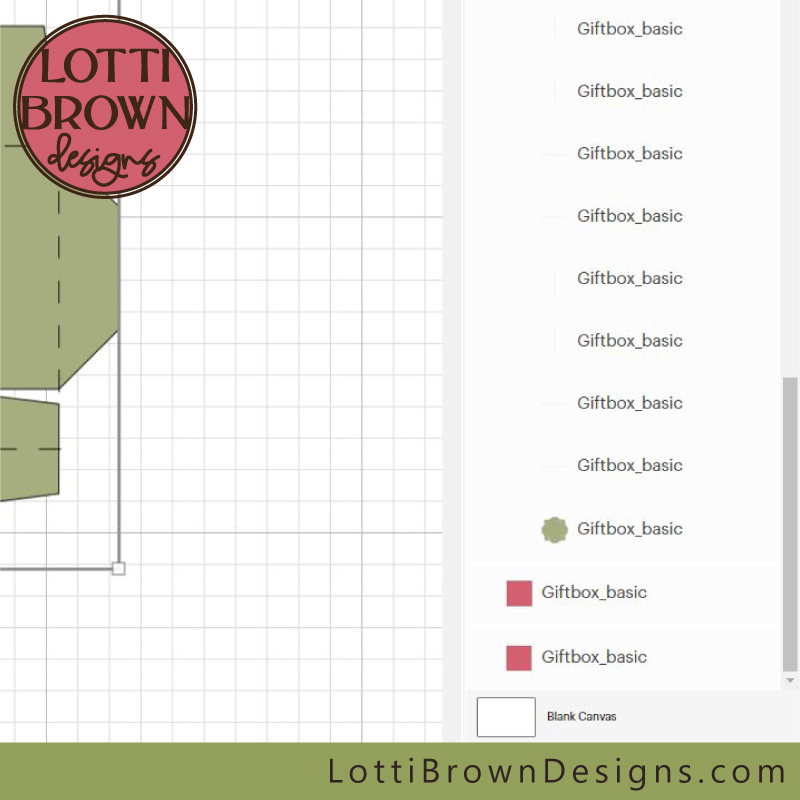 The second set of lines are all attached to the second green square shape. These are inset from the final two items at the very bottom of the list, the two small pink squares.
Are you making the gift card box?
Are you making the gift card box? If so, you have an extra step now. (If not, please continue with the instructions below this panel - go to 8).
Don't panic if you have extra lines showing above the small pink shapes at the bottom of the layers panel - these are to add the score lines to the folding gift box insert - and to add extra cut lines to the insert too. This is where I show you what to do with them...
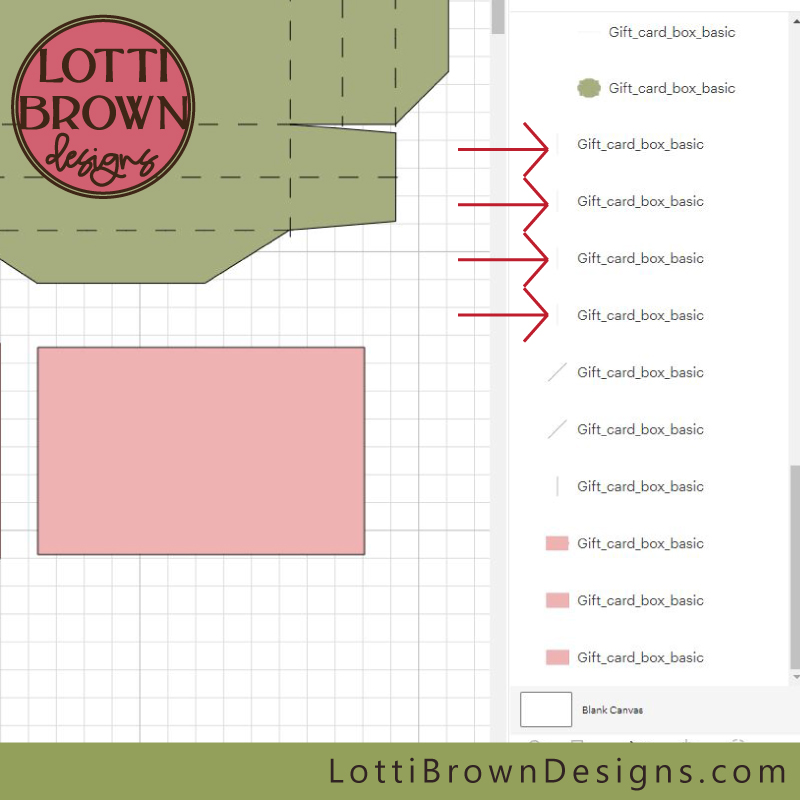 These four lines will need to be set to score
The four vertical lines in the image above are the ones that will need to be set to score (scroll down to the bottom of your layers panel, if your screen doesn't look like this). These are the score lines that will allow your gift card insert to fold.
- Select these four lines by clicking on them while in turn while holding down the 'Shift' key on your keyboard.
- Then access the drop-down menu under 'Operation' and click on Score to set the lines to score - see image below.
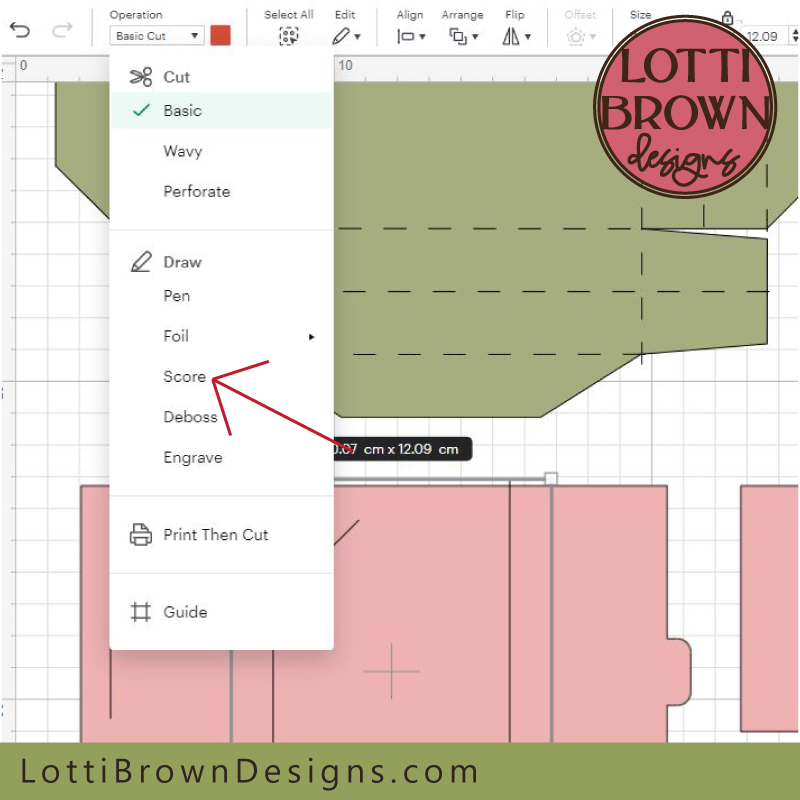 Use the drop-down menu to set these four lines to score
- You can check you've done it right by checking the shape like in the image below - the four vertical lines should all be showing as dashed lines, denoting they're now set to 'score'. Please note that the three shorter lines within the shape should NOT be dashed - we want these to cut not score.
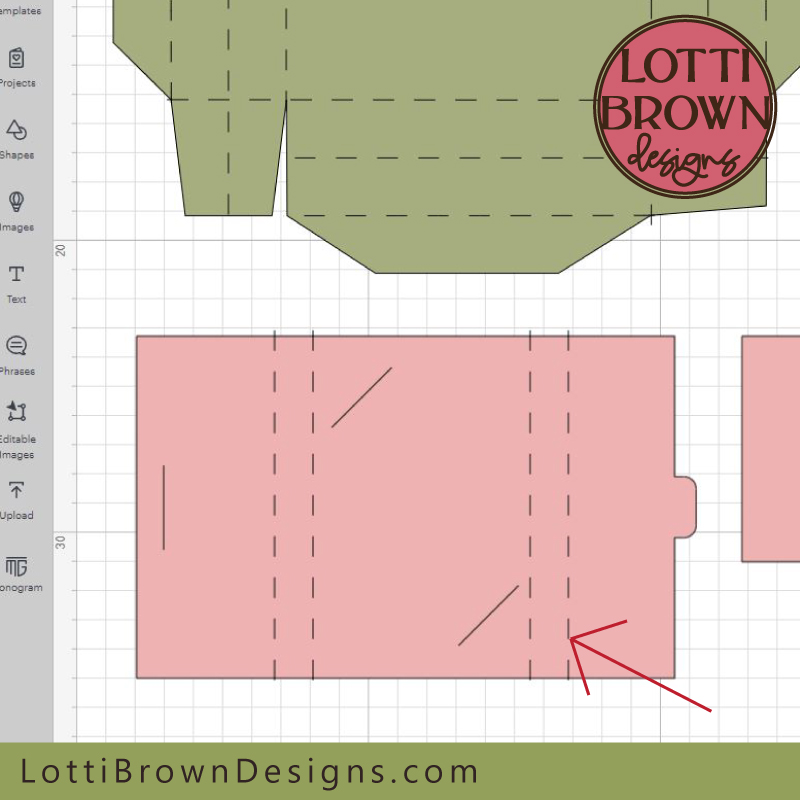 The four vertical lines have changed to dashed lines showing they are now set to score
- Next, select this whole shape and all the lines by clicking and dragging with your mouse to select everything in this shape, including the shape itself - see the image below...
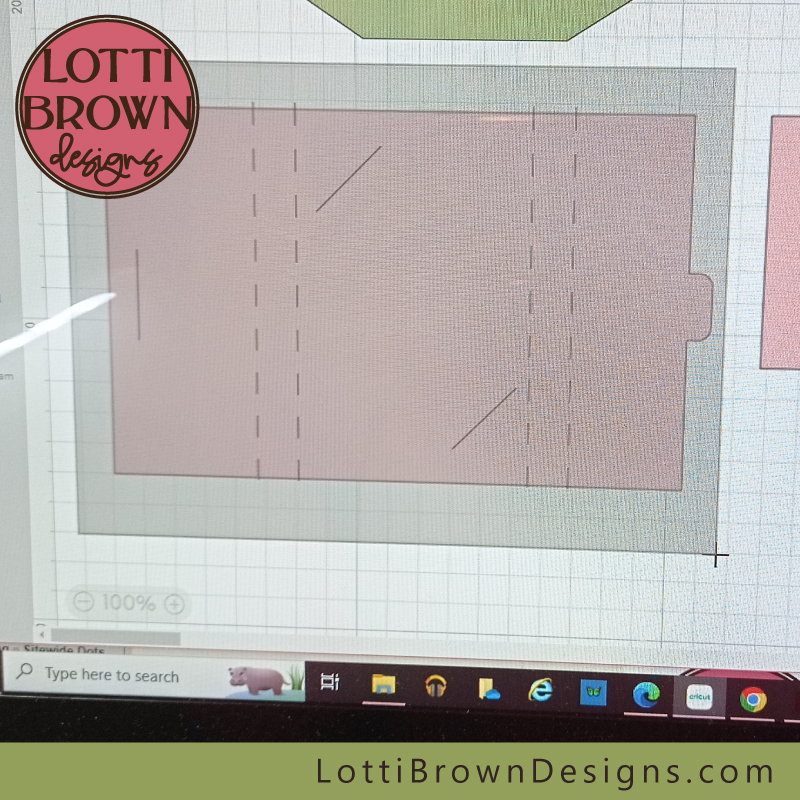 Click and drag to select everything within this shape, and the shape itself
- You can look across to the layers panel to check that all these parts coloured green have been selected - see the image below...
- Then click 'Attach'
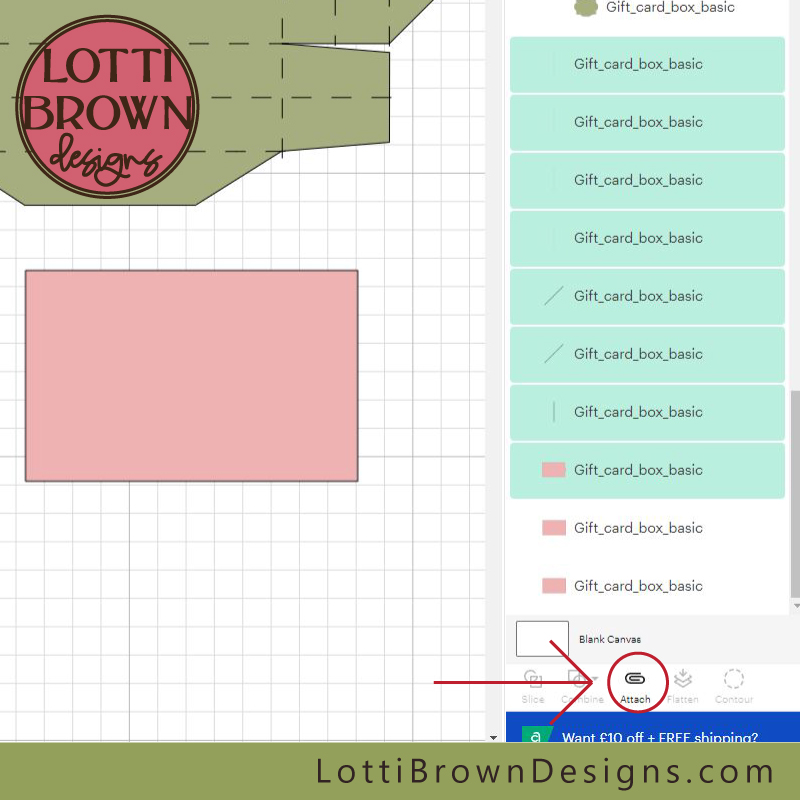 Check the correct parts are selected (turned green in the layers panel) then click 'Attach'
- Your layers should now look like this - see image below...
March 2024 update - click on the arrow next to the 'Attach' paperclip to see the contents of the grouping so that it looks like this!
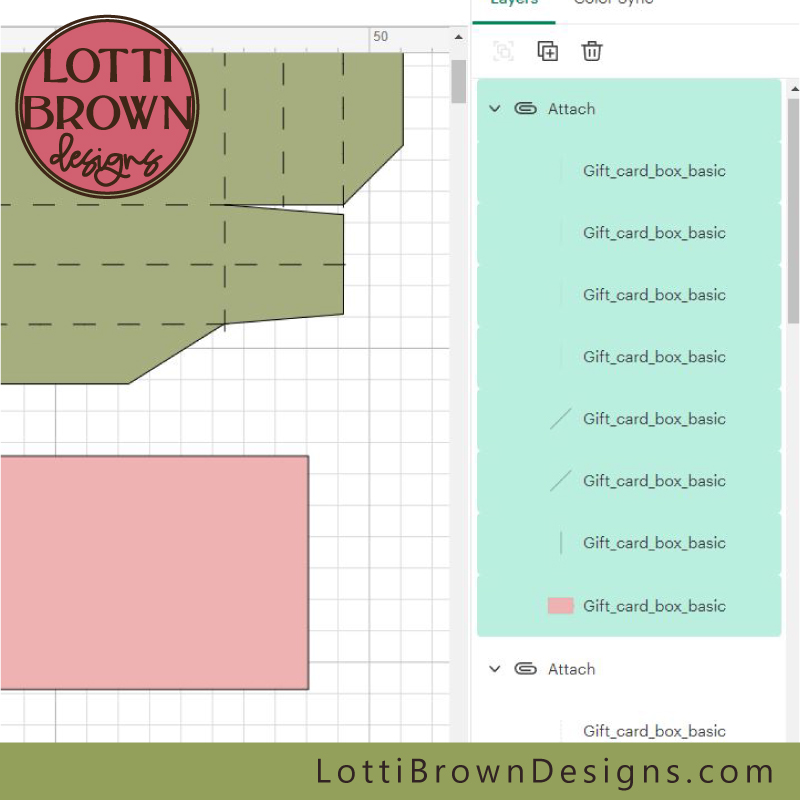 The top of your layers panel should now look like this!
That's it for the special part of these instructions for the gift card box template - now continue on with the instructions below...
8) If you're happy everything looks okay, click 'Make It' (big green button, top right) - see image below...
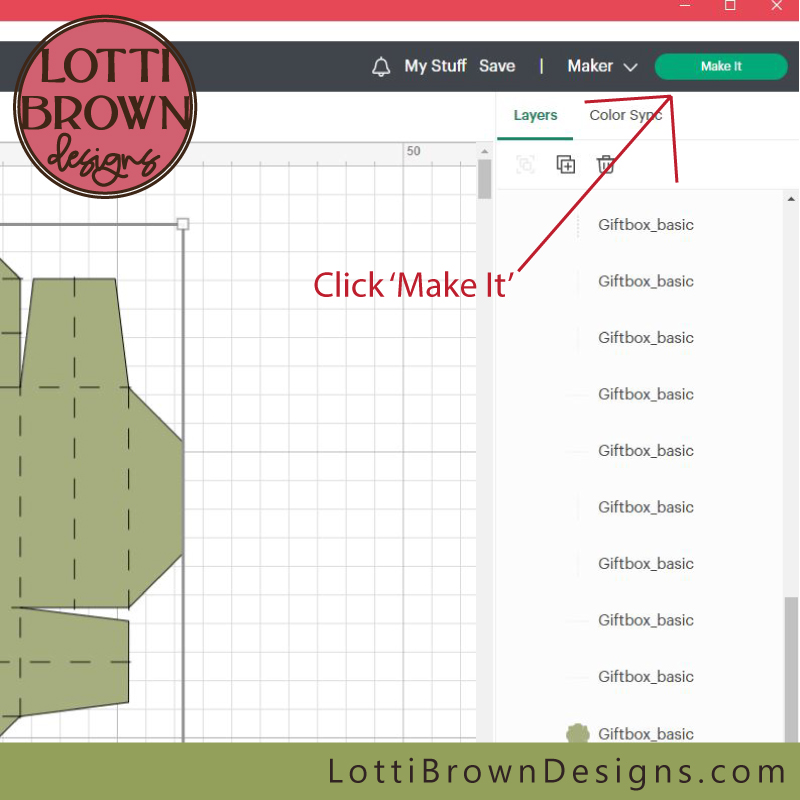 Click on 'Make It'
Cricut Design Space will set out the items as if on mats on the next screen - see the image below...
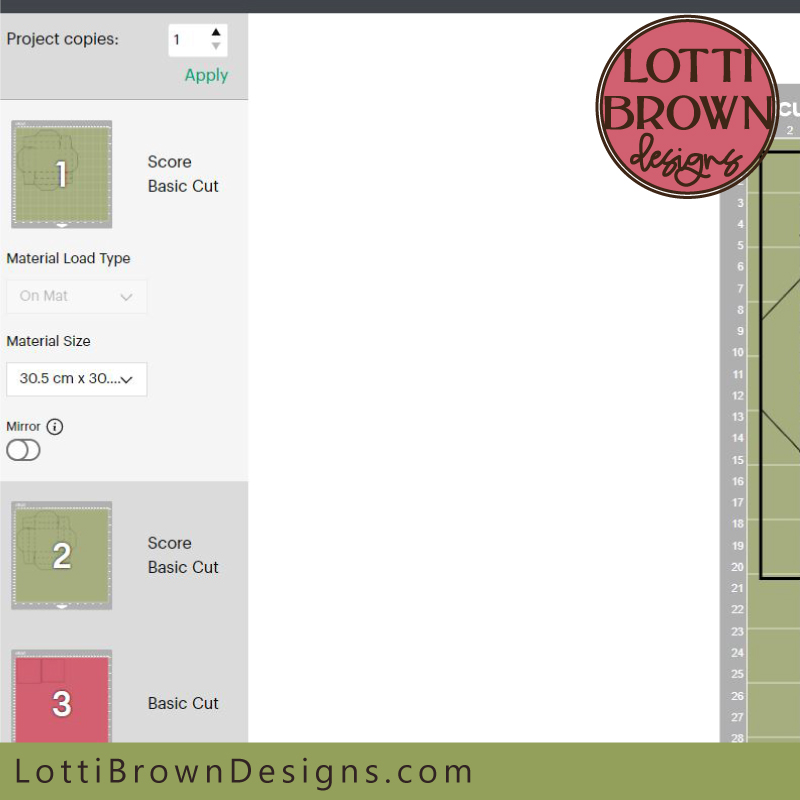 Check the suggested mats to make sure they look correct
You should be able to see three separate mats as in the image above:
- One for each of the larger square shapes (two in total) - each of these should show 'Score' and 'Basic Cut'
- PLUS one mat that includes each of the two (or three, depending on template) smaller squares - showing 'Basic Cut'
- If you're doing the gift card box, all three mats should show 'Score' and 'Basic Cut'
9) Now, click 'Continue' (bottom right) - see image below...
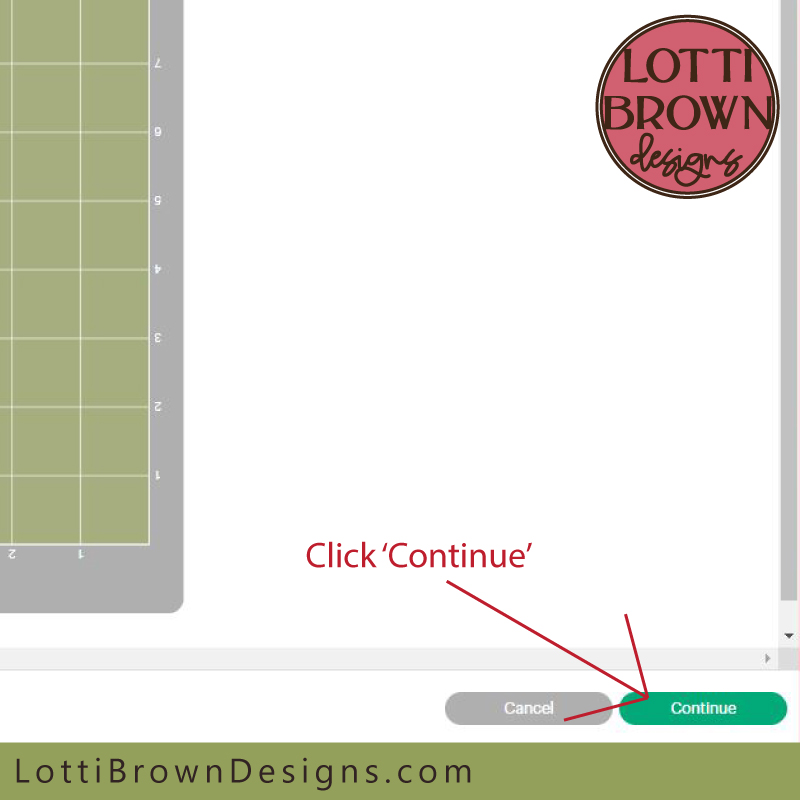 Click 'Continue' to send to cut
10) Select your materials in the usual way, starting with the top mat on the left of the screen - I'm using Sizzix 'Surfacez' textured cardstock and I'm using the 'Medium Cardstock' setting to cut it. I also created the larger of the three boxes I made from this gift box template with Cricut cardstock using the same 'Medium Cardstock' setting.
11) Select your scoring tool - if you're using the scoring wheel with your Cricut, you won't need to do this next bit. Also, if you're using a Cricut Explore or Joy, you won't need to do this either, as only the scoring stylus works with your machine.
So if you see this set up with the scoring wheel below and if you're going to use the scoring stylus instead, just click on Edit Tools (see image below) to change the set-up...
PS - if you're wondering about whether you should get the scoring stylus or scoring wheel for your Cricut machine check out this page for a short discussion (opens in a new window)...
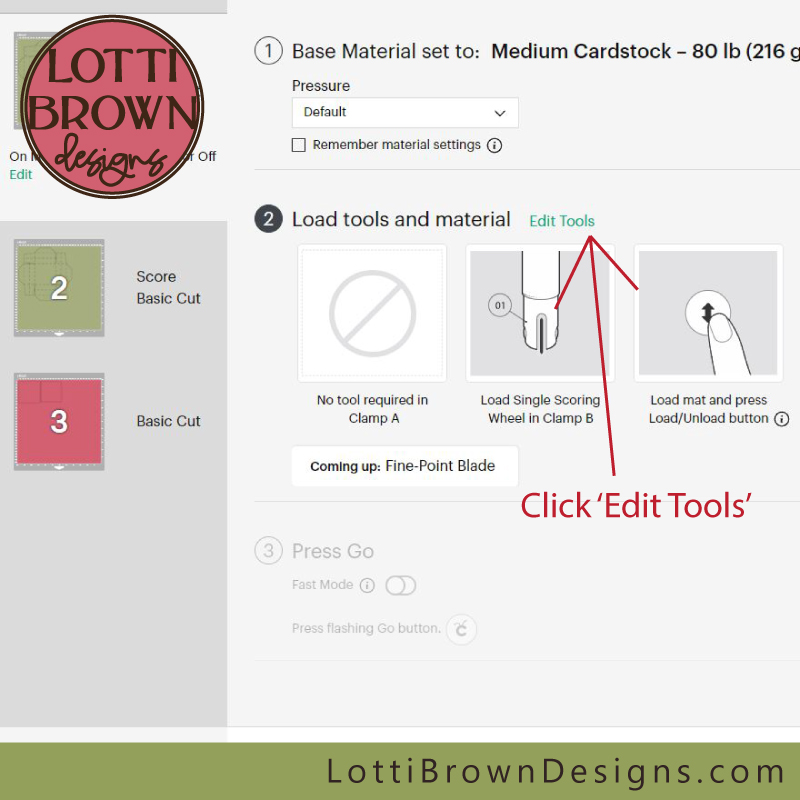 If you're using the scoring stylus with your Cricut machine, click on 'Edit Tools' to make the changes
Then click to select Scoring Stylus (as long as that's what you're using) and then 'Apply' - see image below...
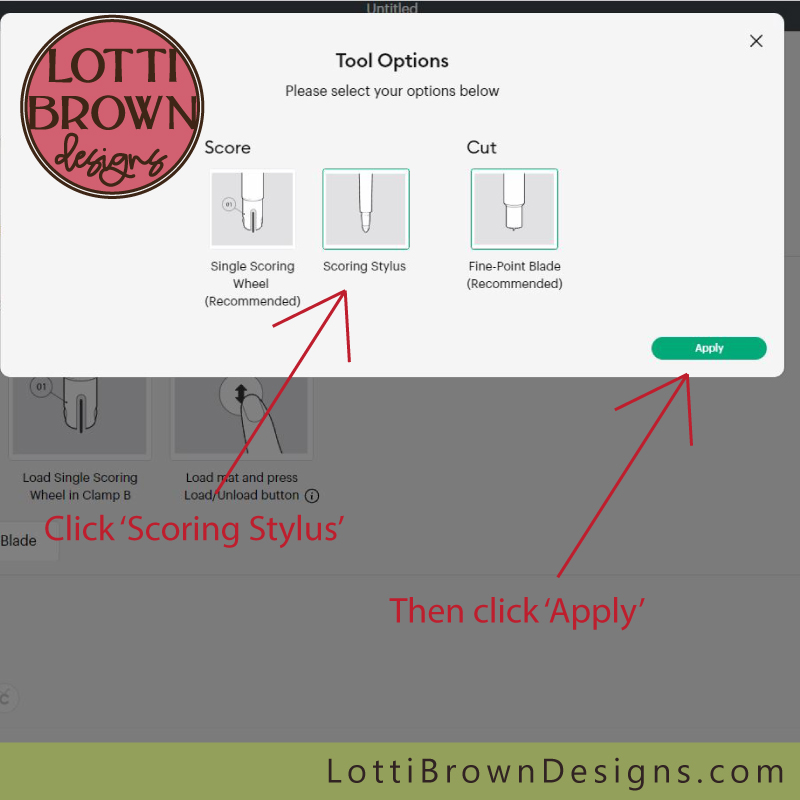 Select Scoring Stylus (making sure that is what you're using) then click on 'Apply'
12) IMPORTANT BIT - whichever scoring tool you're using, remember to put it in your machine now!
13) Check that the correct tools are selected (and in your machine) then load your first mat with the card stuck down well - make sure you have the nice side facing up (not stuck to the mat).
- Press the flashing arrow to load the mat...
- And then the flashing 'C' (when prompted), to start the cut...
- Wait for the cut to finish and then unload using the flashing arrow button when prompted
14) Load the further two mats when prompted by your machine - you may need to 'Edit Tools' again each time.
15) When your items are all cut and scored, you're ready to go onto the second part of this Cricut box template tutorial where I'll show you how to fold and assemble the gift box...
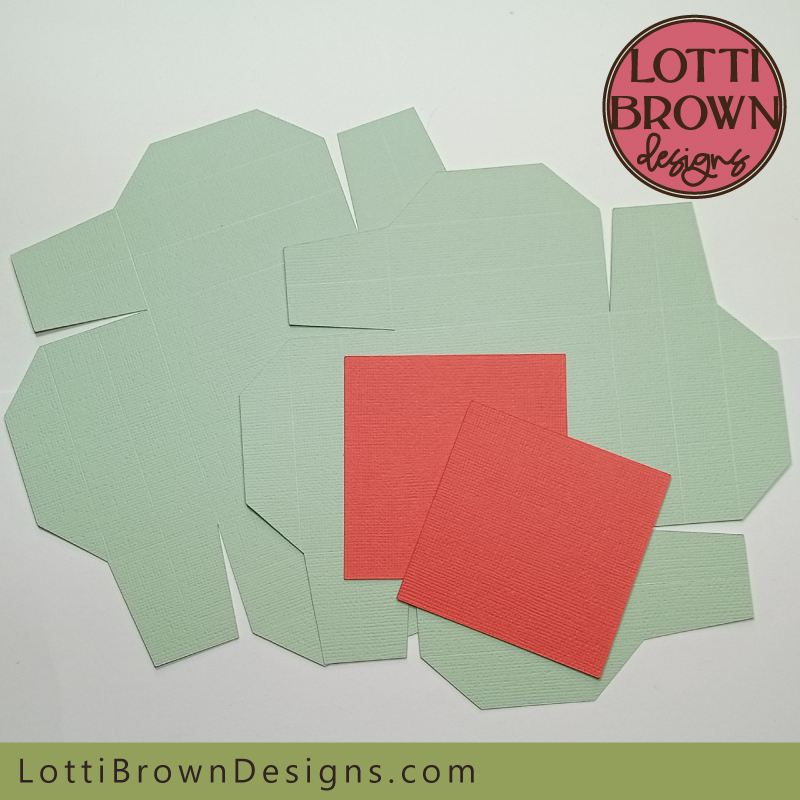 Cardstock cut and ready to fold and assemble into the gift box
If you would like to print these Cricut box template instructions, please use the 'Print' buttons on the page (top right of the page and at the bottom of the content, just below).
This will create a print-friendly version for you and you can also deselect any parts of the page that you don't need to print.
Where to go next
If you've got this far, you should've now cut and scored your Cricut box template and be ready to make your bits of card into something beautiful - see the next part of the gift box template craft tutorial here...
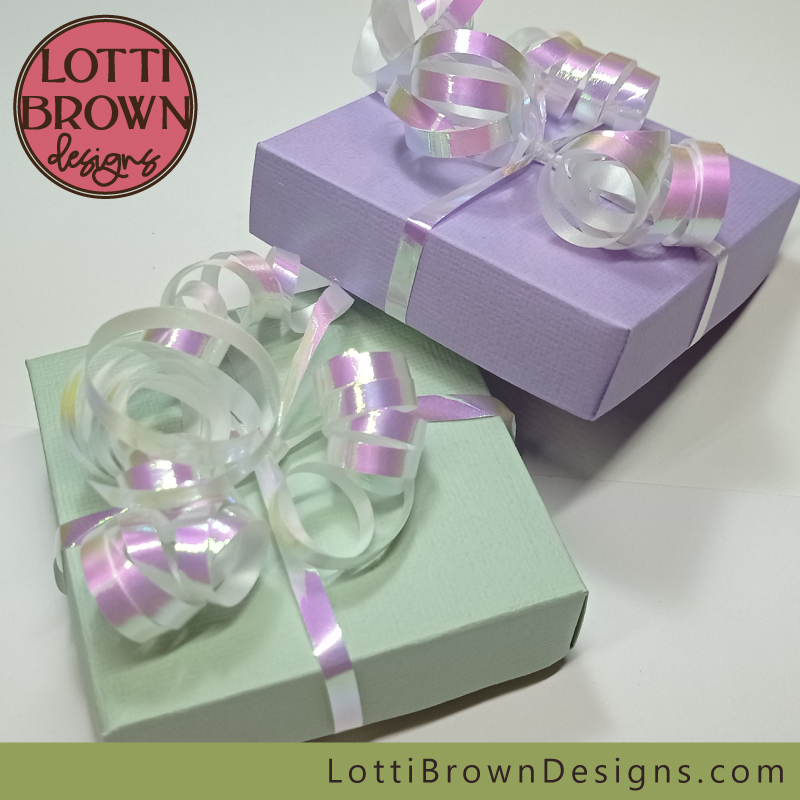 Get ready to make your beautiful gift box!
More Cricut box templates for you on this page...
You Might Also Like:
Lotti Brown's Designs & Templates
How-tos...
- How to use SVG cut files for Cricut (also other cut file formats & machines)
Want to keep in touch?
Sign up below for my free email newsletter...
My newsletter is usually sent out once a month (at the end of one month or the start of the following month) and you can unsubscribe any time...
Sign up below...!
Recent Articles
-
Willow Tree Symbolism and Celtic Willow Art
Apr 11, 25 05:43 AM
Explore willow tree symbolism and meaning - Celtic willow art and printed products... -
Wild Dog Rose Pattern & Products
Apr 07, 25 06:12 AM
Pretty dog rose pattern and products in a nostalgic heritage style recalling pretty hedgerows of flowers... -
British Robin Book Recommendations
Apr 04, 25 06:26 AM
My British Robin book reviews and recommendations - learn about Britain's favourite bird...
Follow me:
Share this page:


