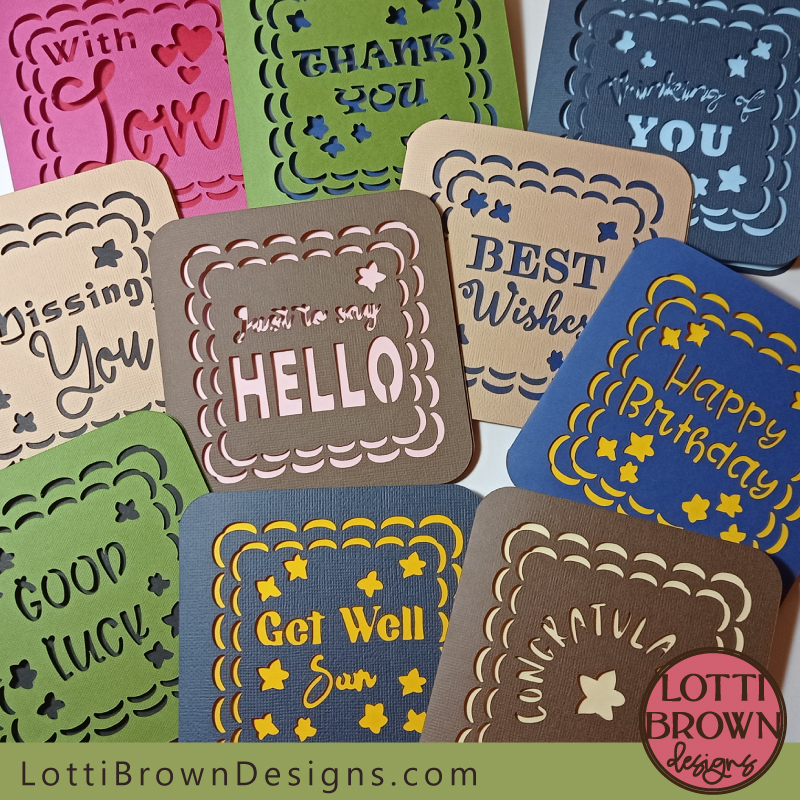
*** IMPORTANT - I'm retiring my digital files - SVG/PNG/DXF/EPS - and printables from 31st December 2025 ***
*** Please ensure that you have everything you need - files and/or instructions printed off from the website (find them currently in the ARCHIVES section) - by 31st December 2025 as they will not be available after this date ***

Card Templates - How to Print and Cut on Cricut
- Home
- SVG files
- Print Then Cut Card Templates
- How to Print Then Cut Cards
How to print and cut on Cricut to make my card templates - follow my easy instructions step by step to get everything set up right in Cricut Design Space and then make the card.
Print and cut isn't difficult - certainly not for these card templates - you just need to know what to do!
So this page is your instruction page to help you make my print then cut card templates with no hassle!
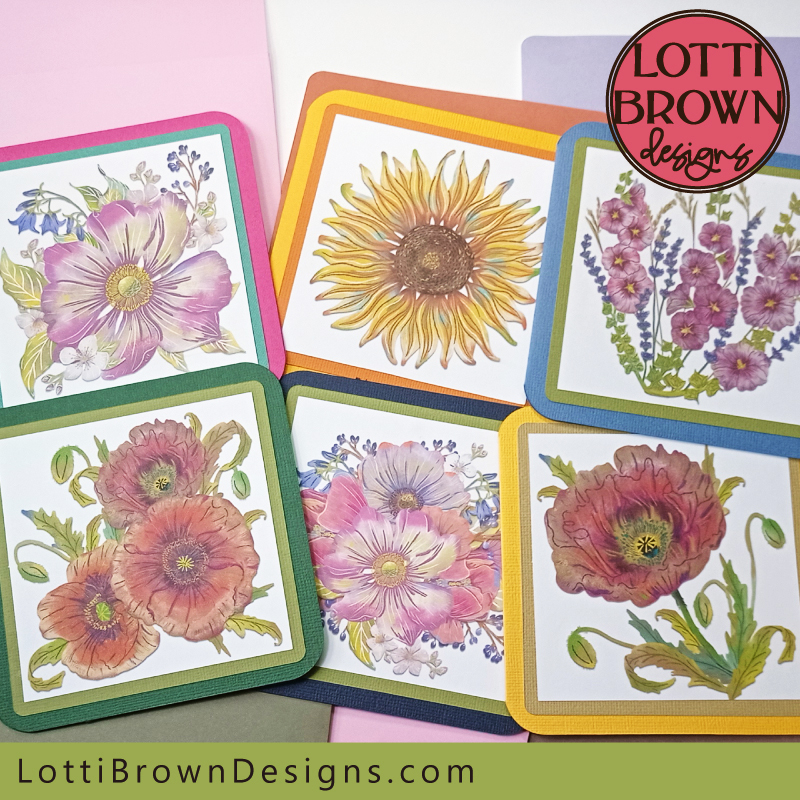 Print then cut card templates for Cricut
Each of my print then cut card templates (you can see my range of designs here) is based on my basic card & envelope template - I've just added a different design to the print then cut feature - this means that it's the same basic instructions for all of the cards.
If you've made some of my paper-cut style cards before, you'll be familiar with the way of making the card and envelope - the print and cut technique gives a couple more steps to do, but don't worry they're easy and I'll show you how...
My instructions use Cricut Design Space, as that's what I used to make my cards. If you have another make of cutting machine with a print and cut function you'll be able to use my card templates - please follow your manufacturer's instructions for how to print and cut using your own machine, although you may find some helpful tips here to help you understand how to set up the files, including the print & score part of the instructions.
If you don't have a print and cut function on your machine, don't worry, as you can still use the card templates - just print them out to the correct size using your at-home printer and then cut them with a craft knife or craft guillotine.
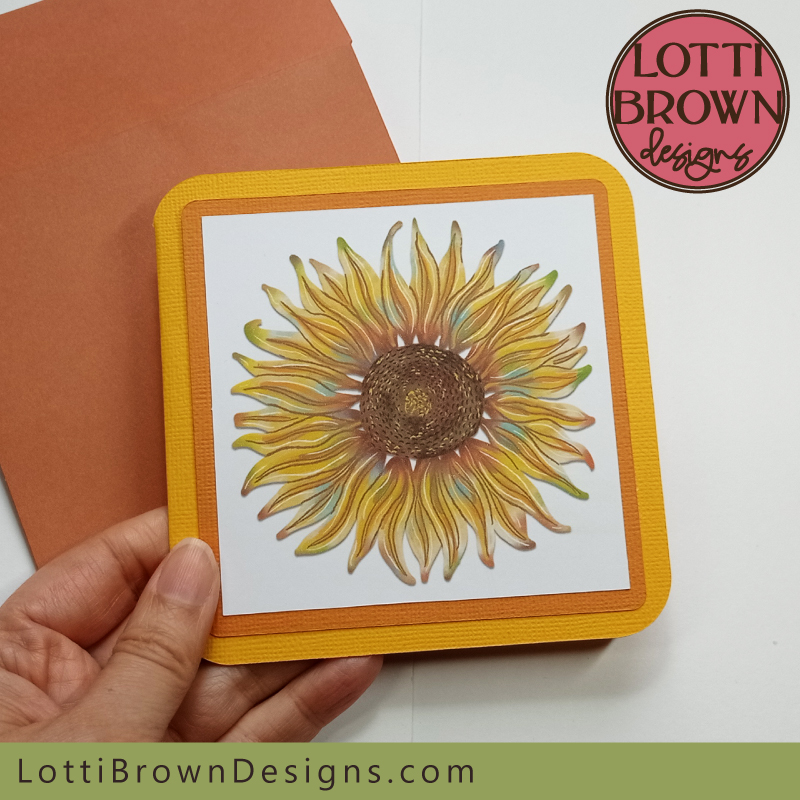 Learn how to make this card using print and cut on Cricut
What you'll need
- Three sheets of A4 or Letter-sized cardstock - I use a medium-weight textured cardstock, like Sizzix 'Surfacez' or Cricut cardstock for one of these sheets, to make the outer card, then two sheets of lighter cardstock or even craft paper to make the inner card and envelope (one sheet each)
- One additional square of cardstock (around 12 x 12cm/4.75 x 4.75 inches) - of a coloured crafting card, similar to the cardstock choice for your outer card in weight and texture.
- One sheet of A4 or Letter-sized white cardstock or letter paper suitable for printing onto - for example - lightweight cardstock, photo paper, or quality printer paper. Try and use a quality paper or card for the best printing results. I look closer at printing onto different cardstock types here...
- Metal rule for folding
- Paper glue for sticking (or double-sided sticky tape)
- Home printer
- Cutting machine (or another way of cutting the card) and basic accessories including a scoring tool (you can also score manually if you don't have the tool on your machine) - more about scoring in the 'Need to Know' section
- One of my print and cut card templates - choose yours here if you don't already have one. The instructions use the sunflower design.
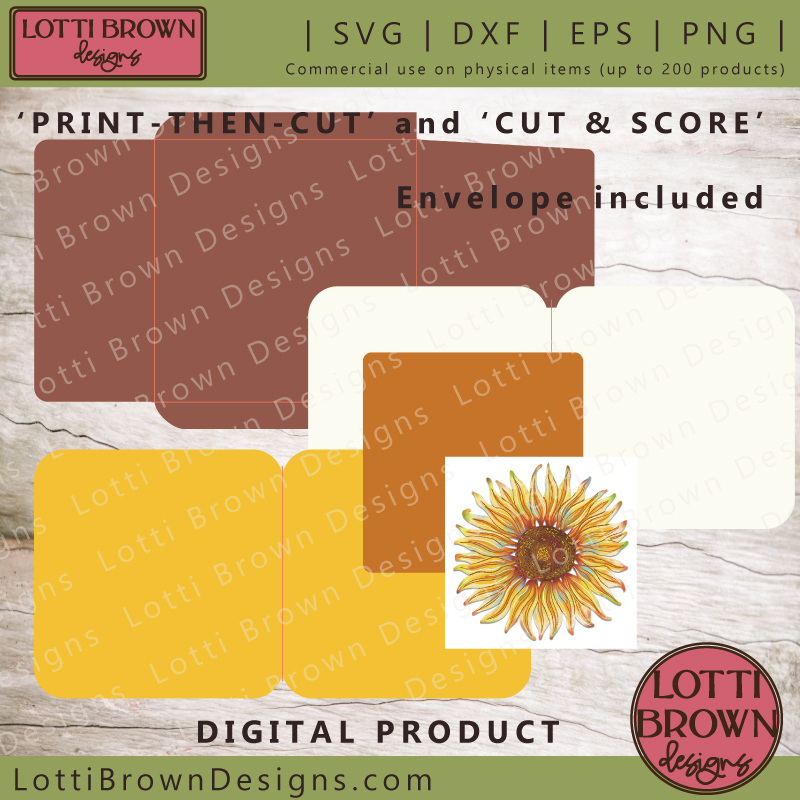 Card template to print and cut on Cricut - sunflower design
Need to know before you start!
- Then print and cut card template comes in two parts in your files, and we'll also make the project in two parts. There's the print then cut design, which is the square with the design on it. You'll use your Cricut to print this with your home printer, and then cut it. Then there's the file to make the main part of the card and the envelope - you'll choose whichever file format you require from the files (SVG, DXF, EPS, or PNG) and set it up in Cricut Design Space to cut and score. Then we just glue it all together.
- Print and cut isn't difficult - I was dreading trying it as I'd heard so many horror stories of things not cutting out in the right place, but when I looked into it, it seems that the key to getting it right is making sure your machine is calibrated...
- Cricut seems to have made a major update to the print and cut function (I think in 2022), so if you haven't used print and cut since then, or have never used print and cut on your machine, when you first use the function it will prompt you to do a test cut and calibrate your machine. I highly recommend you do this - it just involves printing out a page and letting the Cricut cut it and then noting which of the numbered and/or lettered options cut correctly along the line. The Cricut will prompt you through every step to make sure everything is cutting in the right place. So please look out for this and if you get the prompt, do follow their instructions before cutting the design, to make sure you get a good quality cut.
- If at any time you think things aren't cutting as accurately as they could be, you can initiate the calibration process again. To do this, go to your profile (your name) in the top right corner of Cricut Design Space to find 'Settings'. Then go to the 'Machines' tab and select your machine under 'Machine Calibration', select 'Start' and choose 'Print then Cut' when prompted and just follow along with the instructions.
- If you continue to have problems with calibration even after you've calibrated your machine, try switching off any bright lights around your Cricut - apparently this can interfere with what the sensors can pick up. If that doesn't work, please contact Cricut for further help.
- We are printing the designs out on our home printers, so please note that this will print out to your home printer quality and will likely not be to professional print standard. There's a step we'll take to make sure we get the best print quality as we print. My printer is quite cheap but I'm happy with the quality for making and sending the cards I designed, even though I recognize that it's not a professional print standard. I think it's still pretty good and makes the cards look pretty...
- To get the best quality prints from your home printer, you can also make sure you use a quality paper. I've been using a lightweight 160gsm craft card for my prints, and more recently a printable watercolour cardstock (if suitable for your home printer). A quality photo paper, though, is also an excellent option. I do a test of cardstock and paper types for printing onto here...
- If you're using a photo paper, you may need to just carefully slide the white rollers of your cutting machine away from the print area as these can sometimes mark the surface of the print as they pull the mat through. I found I didn't need to do this for my lightweight cardstock.
- If you need the measurements for the card elements, you can find them here...
- Please note that the print then cut design element has been sized to cut to fit this card (9.7 cm or 3.82 inches). We will need to resize it in Cricut Design Space to the correct size. Please note that if you resize it larger than this recommended size, you may find the print quality goes down.
- We will be using the print then cut function on your cutting machine to score the fold lines for the card and envelope and then cut all the shapes. You can do this with your Cricut if you have a scoring tool. I'll show you briefly how to set everything up in these instructions and I also have a much more detailed tutorial (here) that I'll direct you to at the appropriate time if you need more help...
- If you don't have a scoring tool with your machine, you can delete the score lines and then score manually with a knitting needle or similar blunt point, using a straight edge to guide you. More about that plus choosing scoring tools here...
Choosing colours for your cards
In each of my print and cut card templates you'll find suggested colours for the design - and you can also see an alternative colour idea in the extra photos for the product listings in my store.
You're welcome to get creative with the colours and change it up to suit your own creative style or the recipient's colour and style preferences...
Some tips to help you:
- Pick a colour out of the design and use that for the topper square
- Pick another colour out of the design and use that for the main outer card
- Try out having these two colours quite similar or wildly different and seeing which effect you prefer
- Stick to three cardstock colours for the card and envelope (not including white) - many of my templates have a white inner card, which allows me to choose a third colour for the envelope. Again this third colour can be similar to one of your first two choices or something a bit different - if you're going for something a bit different, try and make sure that you can either see this colour in the design or it's not too far off. You can also try the same colour for the inner card and envelope - this can look really lovely when someone opens up the card to have a nice splash of colour inside.
- If you don't like my 'rules', make your own - it's your card and your creativity! Go for it and have fun!
Card template instructions to print and cut on Cricut
We're going to make this sunflower print then cut card template - the instructions are the same for each of the print and cut cards, though, it's just the top design that's different. So please just follow along for your card, whichever design you've chosen (you can see the full range here)...
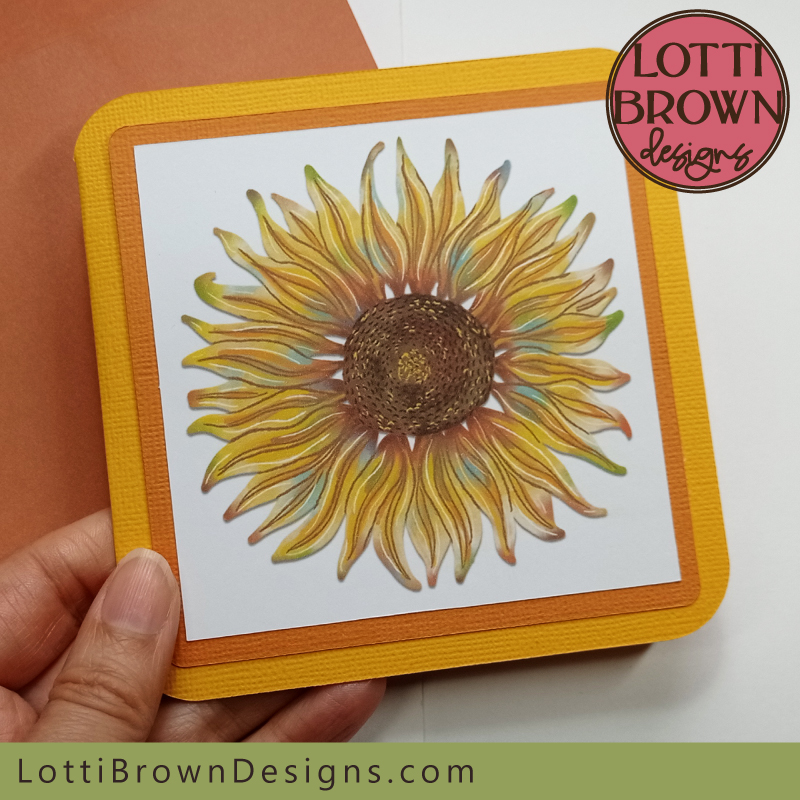 Let's make this print and cut card template together on Cricut
Before we start, if you need any help with accessing, downloading, and opening the files, click here...
We're going to start with the 'print then cut' part of the project, then we'll cut and score the main card parts and the envelope and put it all together.
When you're ready to start your project, open up Cricut Design Space and click on the 'New Project' button in the top right hand corner...
- Then, click on 'Upload' - see the image below...
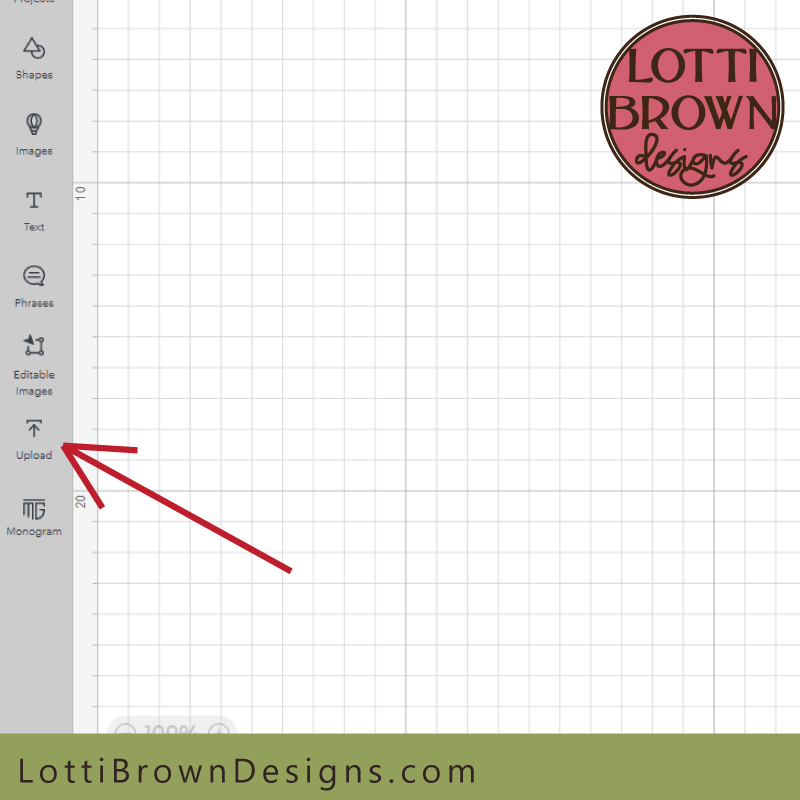 Click on 'Upload' to get started
- And click on 'Upload Image' (see image below) then click Browse to find your folders to find the correct 'Print Then Cut Design' folder and upload the image inside, which is a JPG or PNG file.
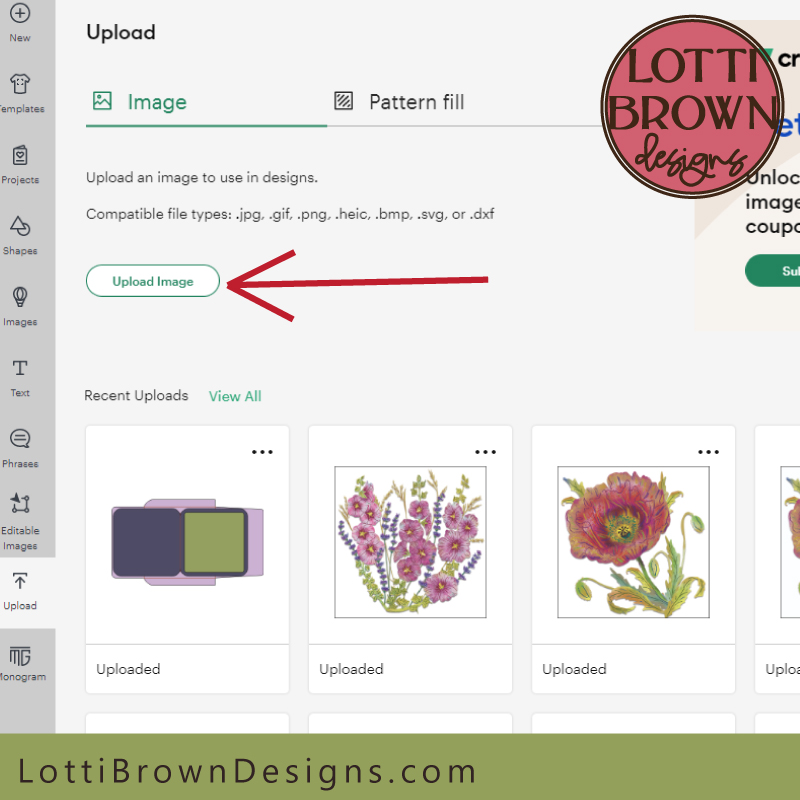 Click on 'Upload Image' then find the JPG image in the 'Print Then Cut Design' folder
- Your Cricut will ask you to select the image type - select 'Complex' (see the image below)..
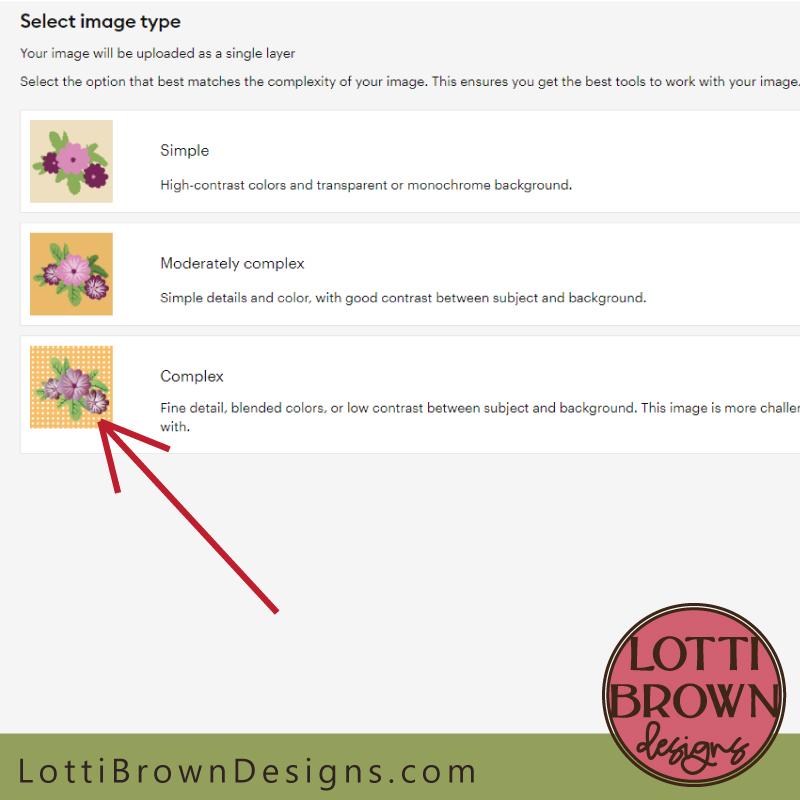 Select 'Complex' as the image type
- Press 'Continue' (bottom right of the screen) - see the image below...
 Click to 'Continue'...
- Your image will appear in the middle of the screen with a section called 'Background Remover' across on the left hand side. Ignore this and just click 'Apply and Continue' in the bottom right - see the image below...
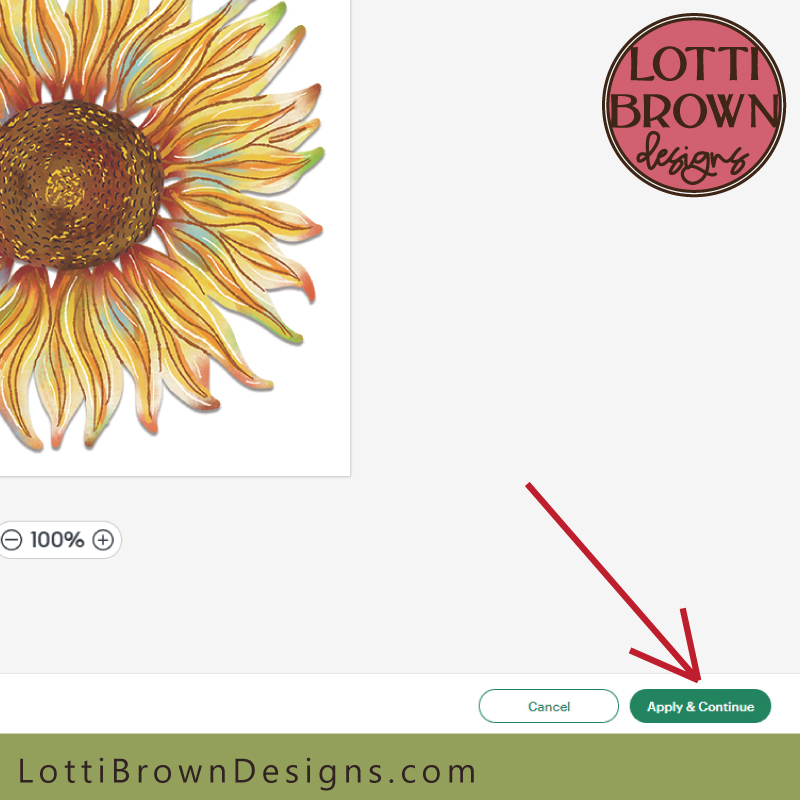 Click 'Apply & Continue'
- You will then be presented with two images on the screen - choose 'Print then Cut Image' on the right (see the image below), and click on the image to make the edges of the box around it turn green...
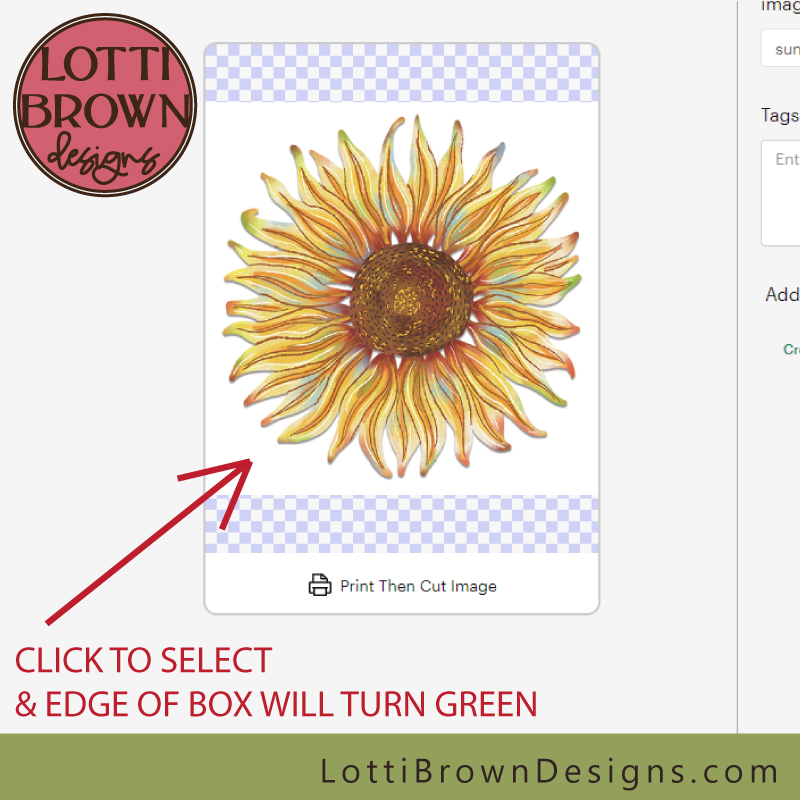 Select 'Print Then Cut Image' and the edges of the box surrounding it will turn green
- With the 'Print Then Cut Image' option selected (box edge green) click on 'Upload' (bottom right) - see the image below...
 Click to 'Upload'
- The new image will appear in the picture list of recent uploads like in the image below - just click on it to select it and see the edge of the box turn green...
- By the way, if you want to use this same image again for print then cut, you don't need to go through all these previous steps again, just find it in your list of recent uploads and click on it and go from this step.
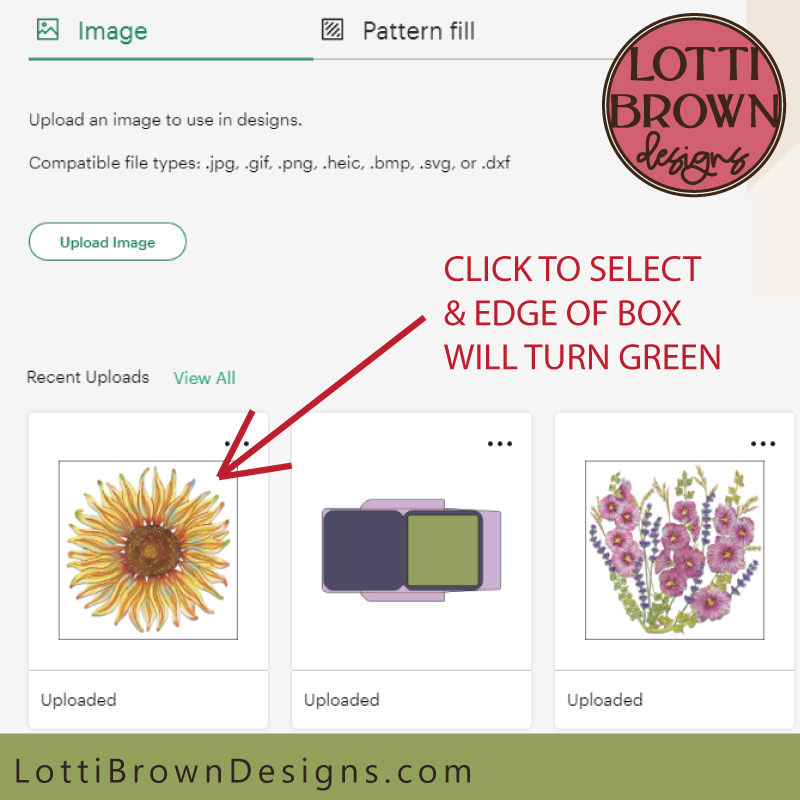 Click the image to select it and the edge of the box will turn green
- Then click on 'Add to Canvas' (bottom right of screen) - see the image below...
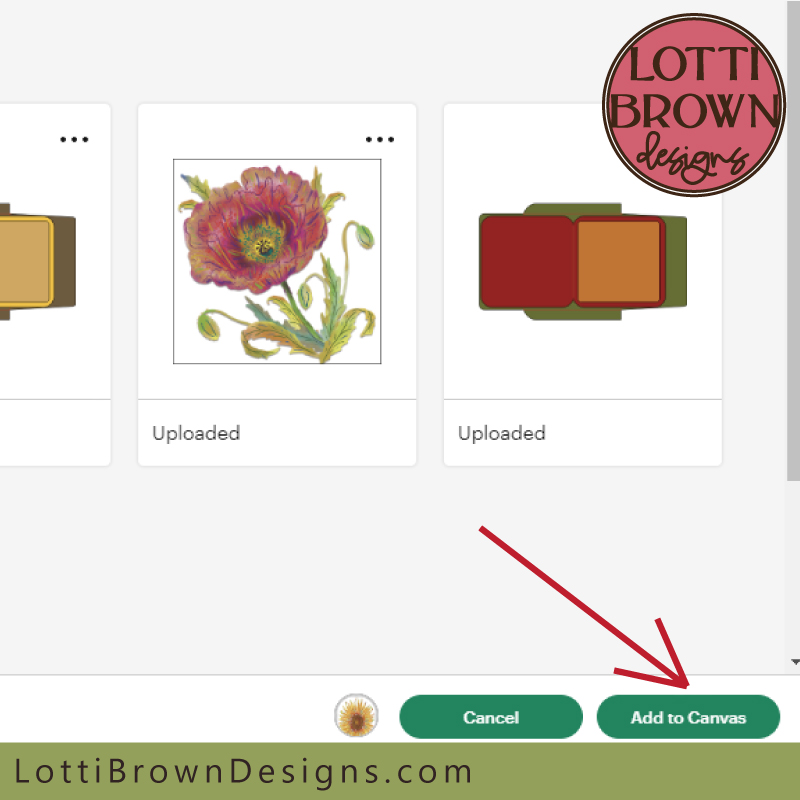 Click on 'Add to Canvas'
- The print then cut image will then appear in the top left of your screen like in the image below - you can also see that the operation is already set to 'Print then Cut' (look in the 'Operation' box in the top tool bar just above the image - not shown in the image below).
- Unfortunately, the image will appear in Cricut Design Space larger than it should be. This is because Cricut Design Space is (weirdly) set to a resolution of 144ppi/dpi so it resizes any PNG/JPG image to fit this resolution. However, if you use an image that automatically imports to the correct size in Cricut Design Space, it will give you a print quality warning. So we want a high quality print so we'll need to resize it manually to the correct size...
- To resize the image, first check that the little padlock in the sizing section (highlighted in the image below) is showing locked (padlock closed) - this keeps the ratio of the image locked as you resize. If it's open, click it once to lock it.
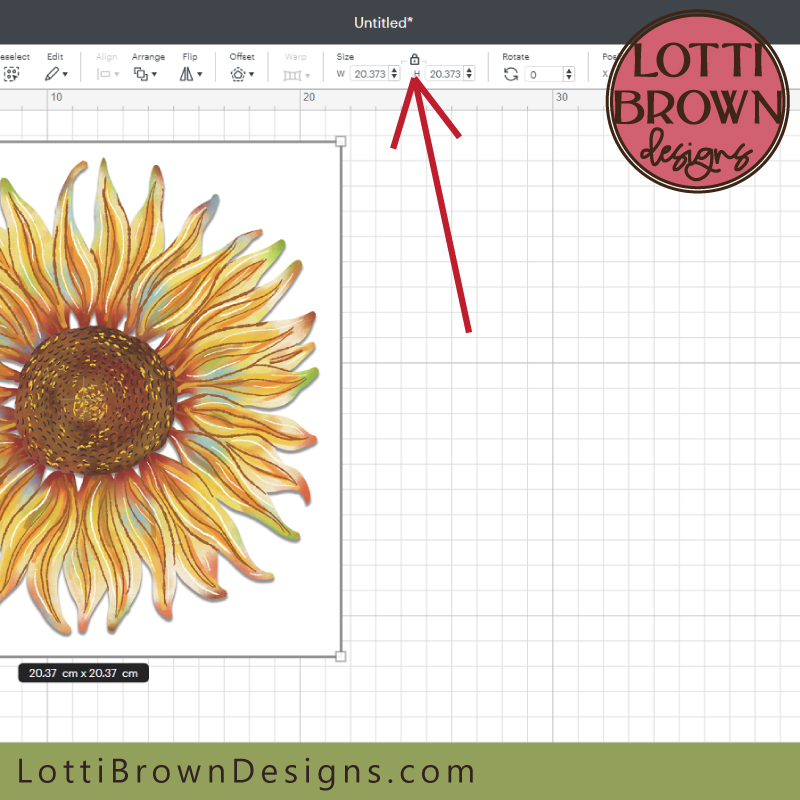 Check the padlock is showing locked (padlock closed)
- Now, we just need to manually type in the correct size into the first W box...
- You will also need to check if your Design Space is set up in metric or imperial measurements - an easy way to find this out is to check the size that it tells you at the bottom of the image - for example in the photo above, you can see that it's working in centimetres (cm) - this means that I must use the cm measurement for resizing. If yours is working in inches, you must use the inches measurement as you resize.
- For the cards, the correct size is 9.7 x 9.7 cm (or 3.82 x 3.82 inches)
- If you're following these instructions for the Christmas decorations, the correct size is 9.5 x 9.5 cm (or 3.74 x 3.74 inches)
- Using the image any larger than this recommended size may cause loss of print quality
- So type in the correct size (in cm or inches) in the first, 'W', box like in the image below - then click once into the second, 'H', box and the image will set to the correct size with the correct measurements also showing in the W and H boxes. If it's a tiny portion of a cm or inch out on one of the measurements, don't worry - it does happen like this sometimes and it doesn't need to be a precise fit for this project.
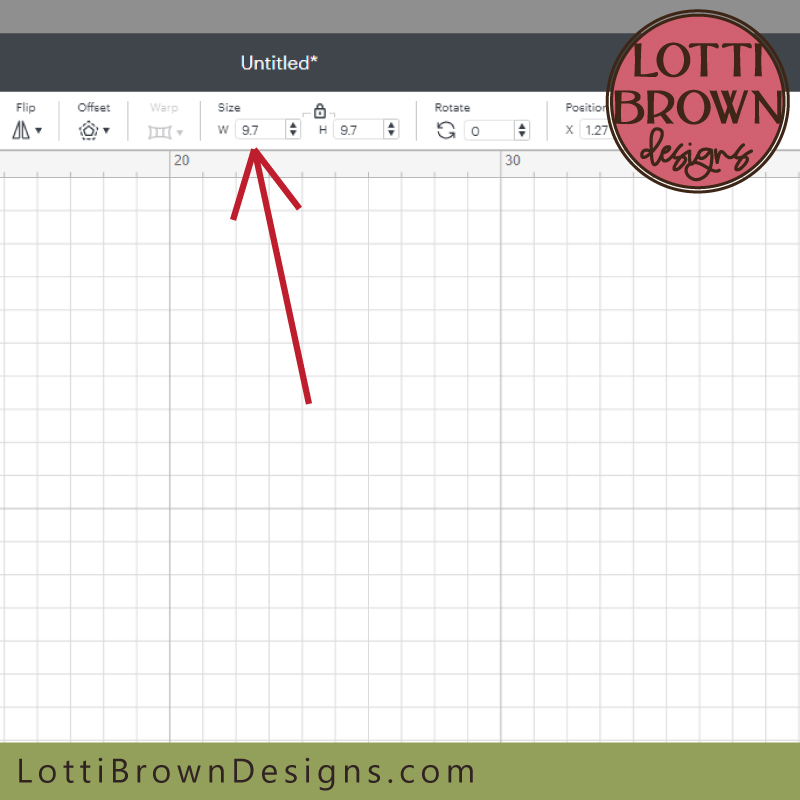 Type in the correct measurement in the first W box - use cm or inches, whichever your Design Space is set to already (check the measurements showing below the image if you're not sure)
- You can check below the image to double-check the size is correct - see my photo below...
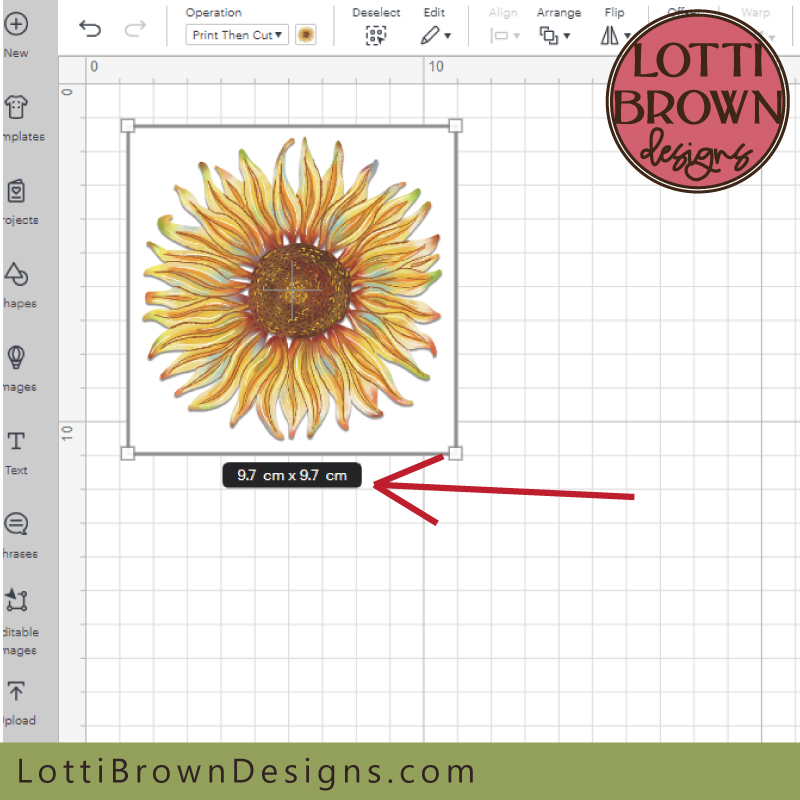 Check the measurement is correct for your image (cm shown here)
- Everything is now ready, so just click 'Make It' on the top right of the screen (see the image below)...
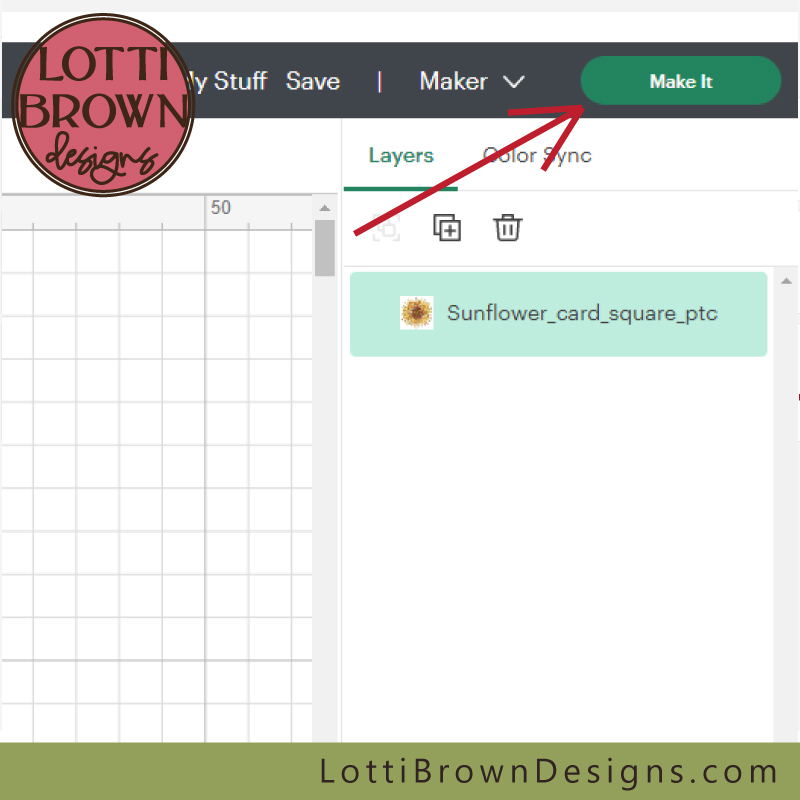 Just click 'Make It'
- Now we're on the screen with the mats - you can see that it says this is a 'Print Then Cut' project. It's important that you check the material size, as indicated in the image below, and select your correct paper size that you use in your home printer. I'm using A4 size (21 x 29.7 cm) so I need to change mine using the drop down menu.
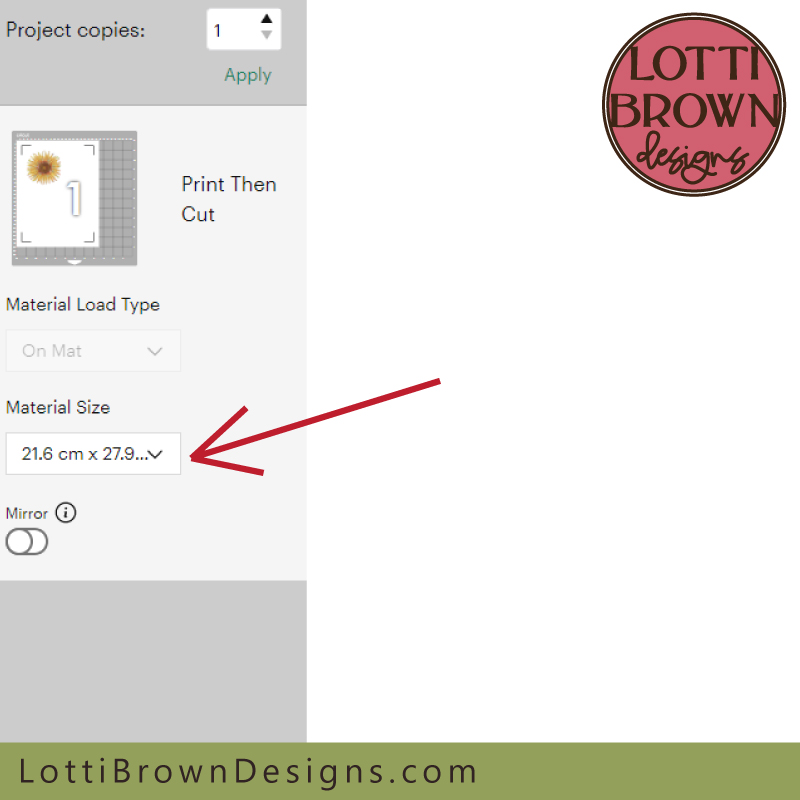 IMPORTANT - Check your paper size and make sure the correct size is selected for your own home printer
- You can see the image now the middle of the screen - the black lines and big black square are just representative as mine printed out slightly differently, as you'll see later. But don't worry, you won't see these black lines at all once the image is cut. They're just there to help your Cricut read the image and know where to cut. The red dotted lines you can see in the image below only appear when you hover over the image (in Cricut Design Space).
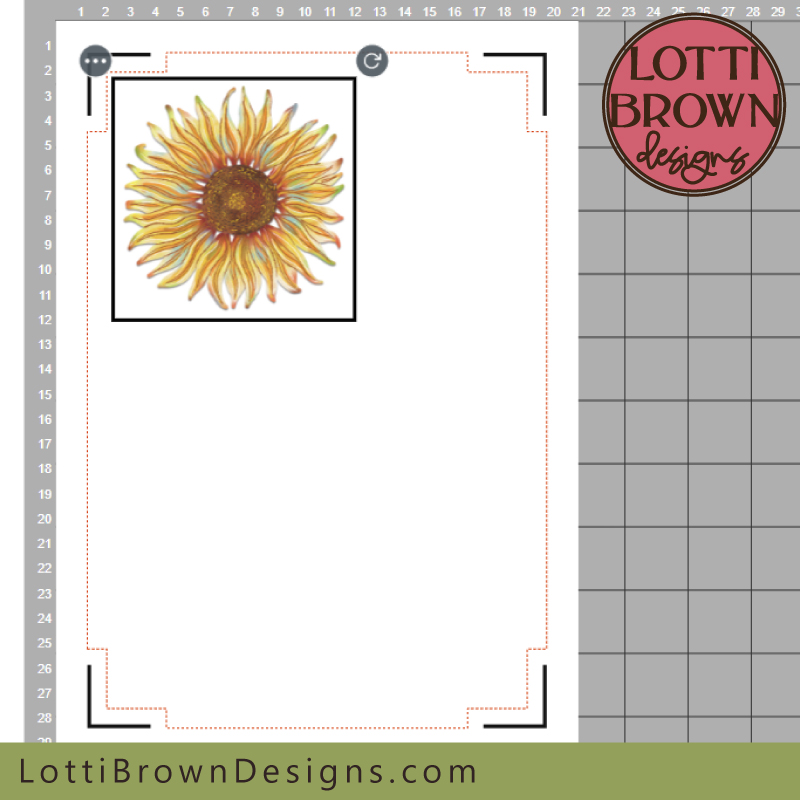 This is how your Cricut will print your image using black registration marks to see the size and position of the paper accurately
- When you're ready, just click on 'Continue' (bottom right) - see the image below...
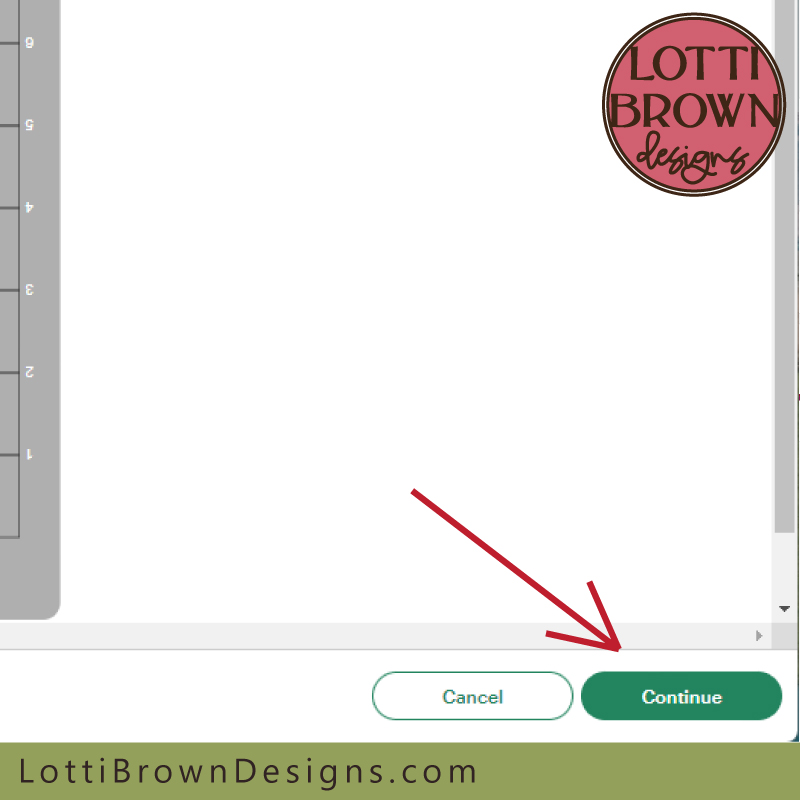 Click to 'Continue'
- On the next screen, you can check that the paper size for printing is correct - then click on 'Send to Printer' - see the image below...
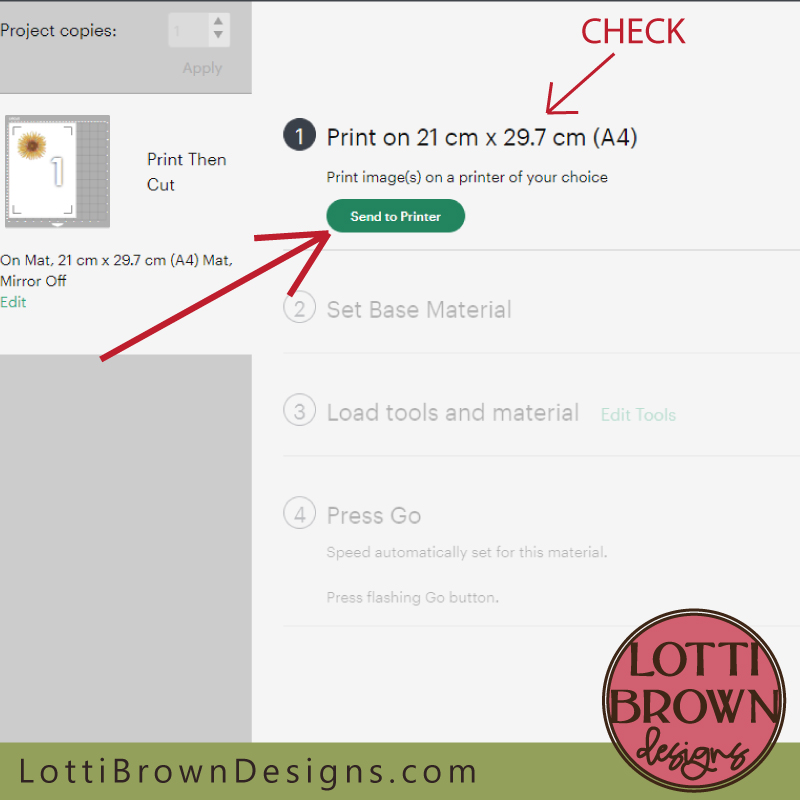 Check your paper size is correct - then 'Send to Printer'
- Now, we move on to Print Setup - see the image below. Here's another chance to check your paper size is correct...
- And also to make sure that Cricut will send your print to the correct printer!
- We'll also turn off Add Bleed. In most cases, you would leave 'Add Bleed' turned on for print and cut on Cricut, but for these images with white backgrounds it seems to work better with the Add Bleed turned off (otherwise the Cricut was adding blurry marks). If you do have a coloured background to your print then cut image, I recommend leaving the Add Bleed turned on. But for these particular images with the white background, turn it off (click on the button to make the green go white)...
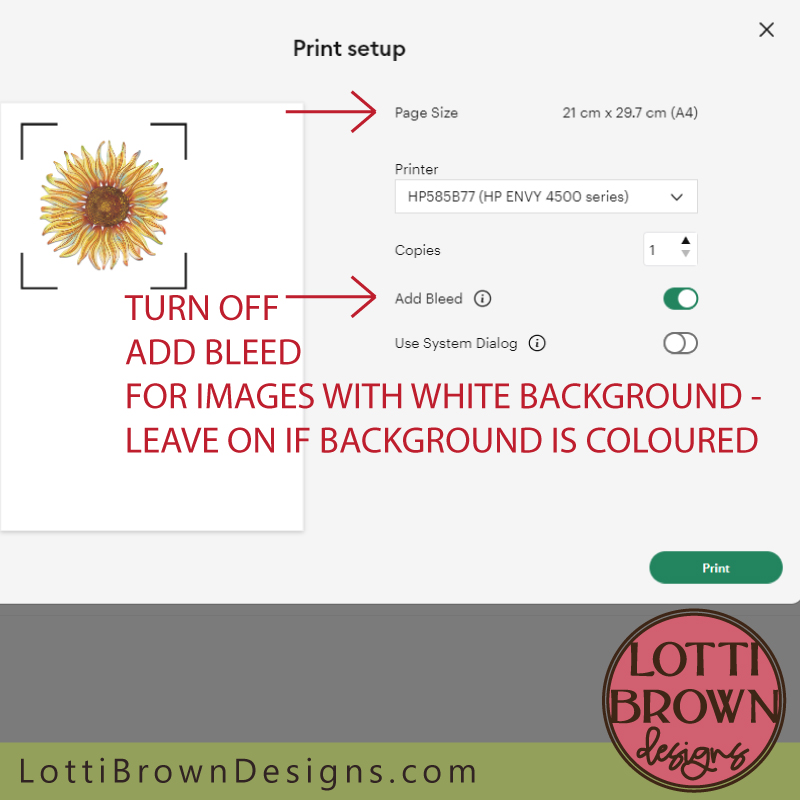 Turn off 'Add Bleed' for images with a white background - turn it on if your image has a coloured background
- Then, turn on 'Use System Dialog' (see the image below) - make sure the button turns to green. This allows you to use your printer's settings to control the quality of the print - something we want to be able to do. Cricut reminds you to confirm the paper size in the printer settings matches what you set up here, and lets you know that your print dialog box may appear behind Design Space.
- And then press 'Print' (bottom right) - see the image below...
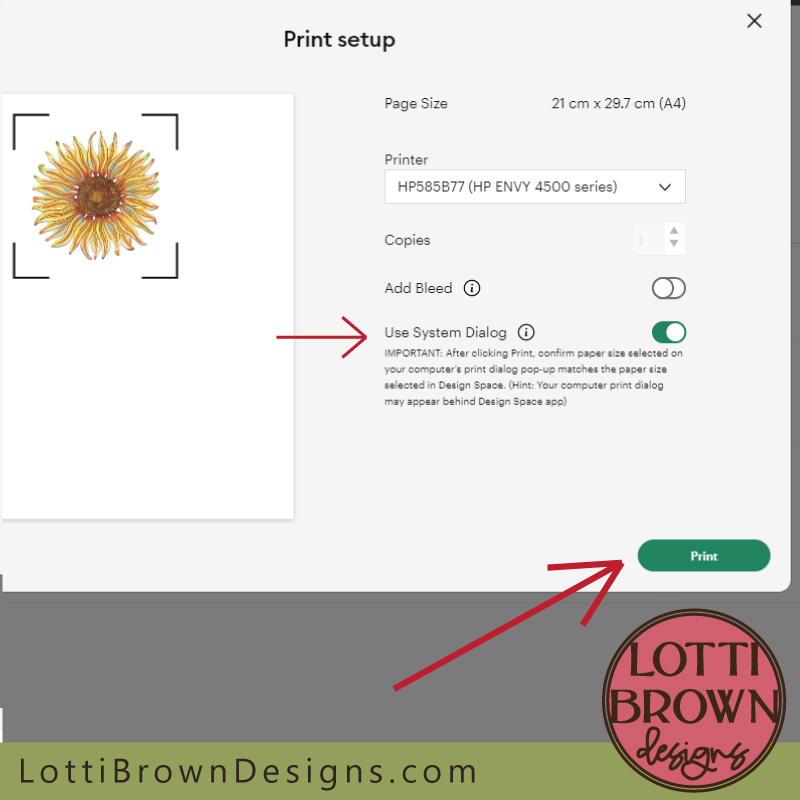 Select 'Use System Dialog' then press 'Print'
- Your print dialog box should just pop up (remember to check behind Design Space if you don't see it). The images below show mine - yours might be slightly different as it depends on your own home printer.
- Make sure the correct printer is selected.
- Then go to 'Preferences' (may also be called Settings or similar...
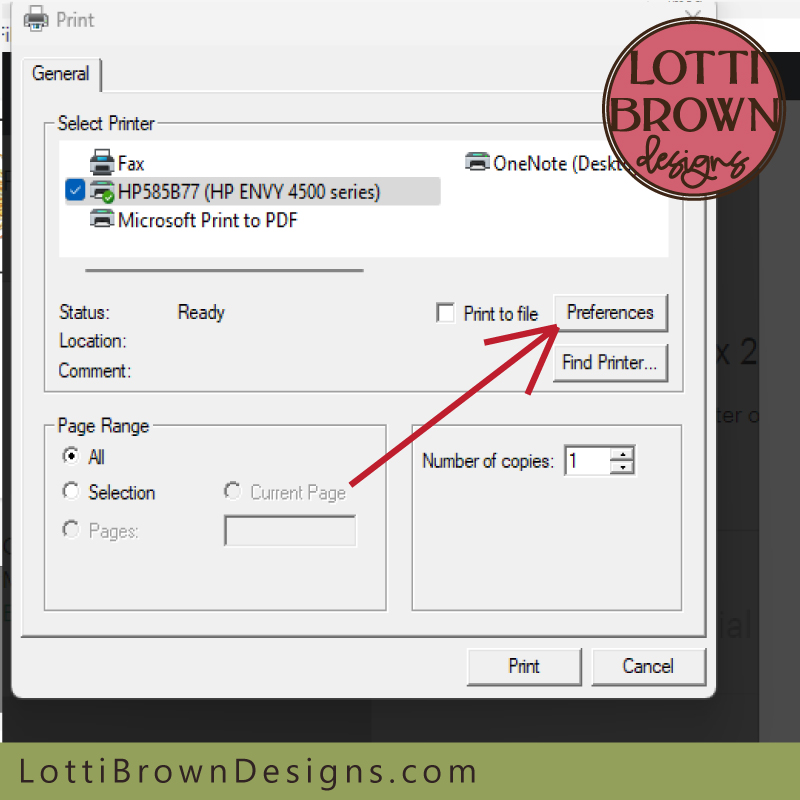 Check the printer is correct and click on printer 'Preferences'...
- Here, we make sure the layout is correct (Portrait) in the Layout tab...
- Then click on the 'Paper/Quality' tab (see the image below)...
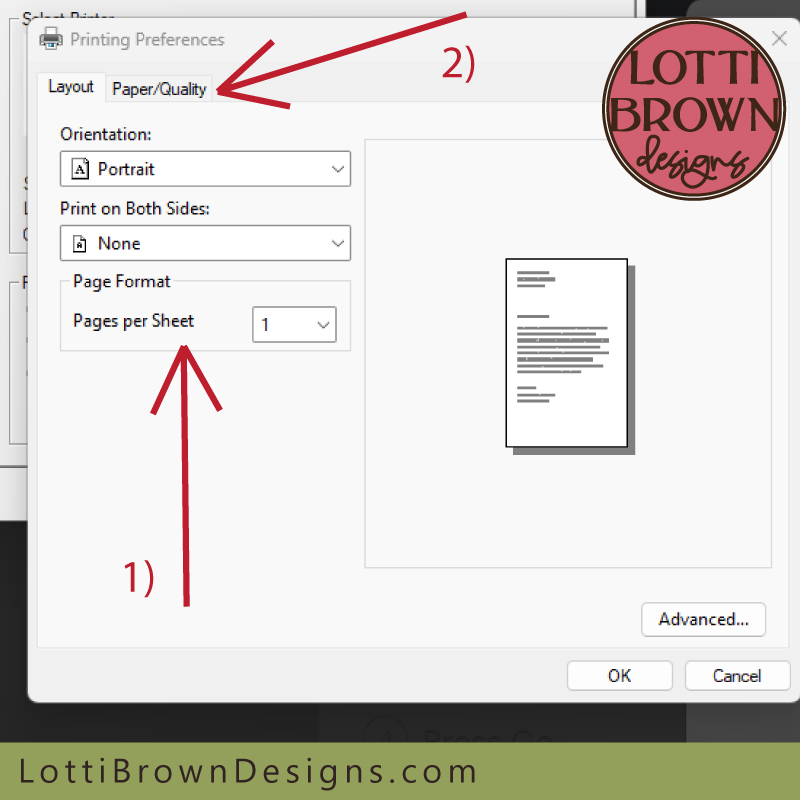 Check the layout is correct then click to set 'Paper/Quality'
- Here, set your paper source and also your paper type under 'Media'. There are usually options for photo paper. I've chosen 'Other speciality papers' to accommodate my light cardstock. This is also a good time to make sure that your printer is loaded with the correct paper type before you press print!
- Then set 'Quality Settings' to 'Best' - we want to use our printer's best quality.
- And then make sure the print is set to 'Colour' - see the image below...
- You can also click on 'Advanced' to see if there's anything you want to change in there - mine had nothing to change.
- When you're ready to move forward, click on 'OK'
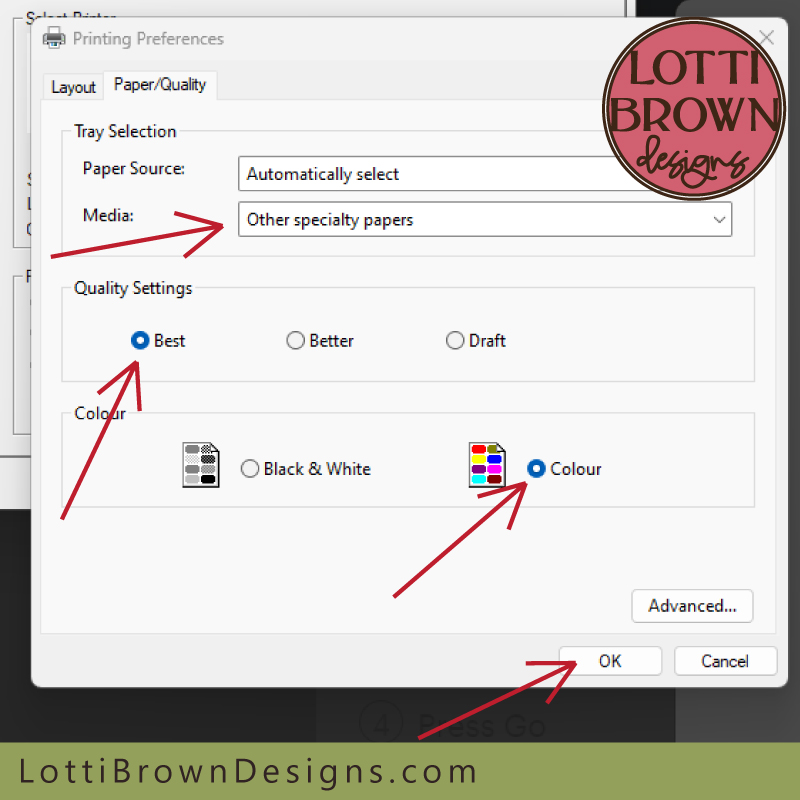 Select your paper and select best quality printing in colour
- You're then taken back to your main print dialog box (see the image below), so if you're happy everything is correct and your correct paper is loaded ready in the printer, click on 'Print' to print your page...
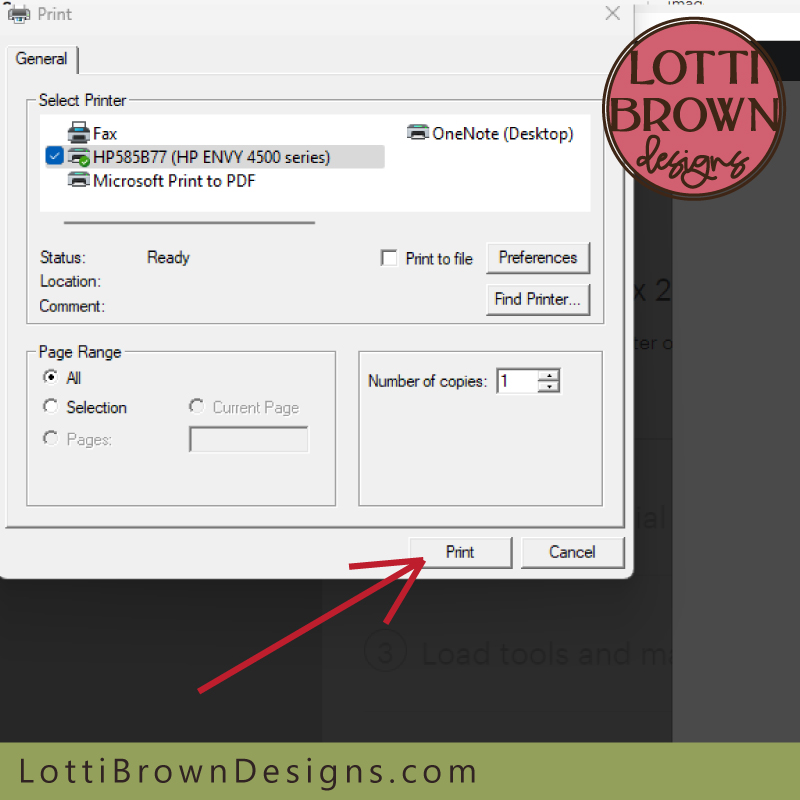 Click to 'Print'
- Once your page has printed on your home printer, it should look something like mine (below) - you can just see the very faint cut lines around the image (inside the big black lines) - stick it onto the top left corner of your mat, like mine in the image below.
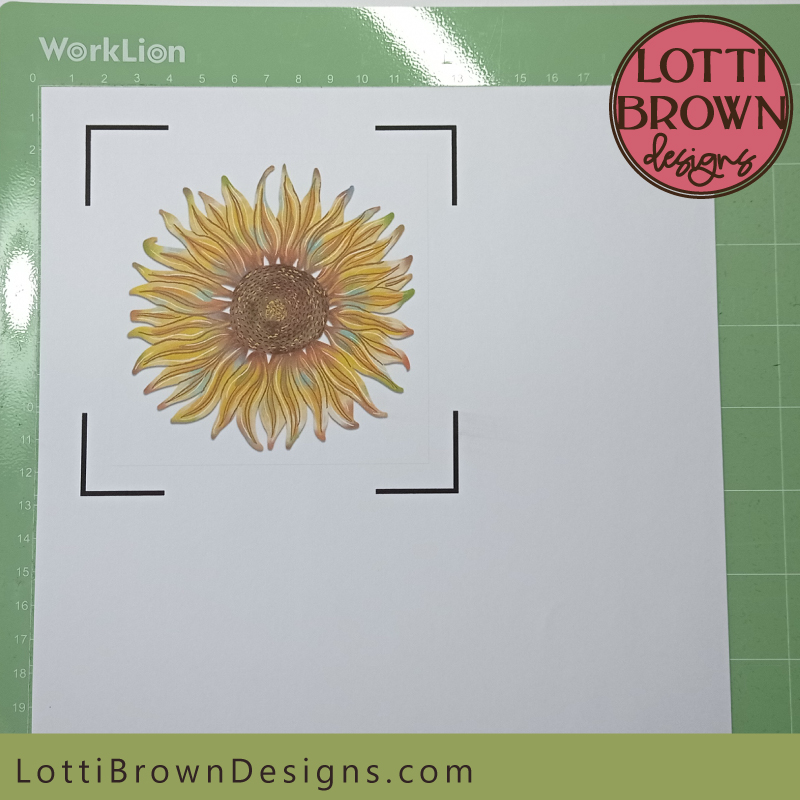 Stick your printed page onto the top left corner of your sticky mat
- Next, set your base material as you normally would (see image below) - I used Light Cardstock for my 160 gsm card.
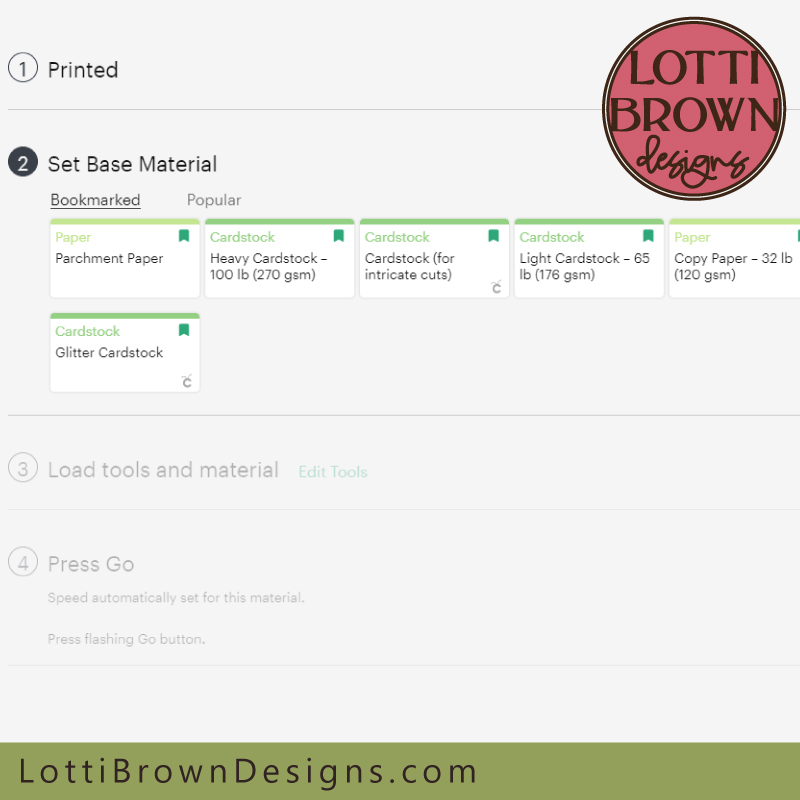
- Then load in your mat (see image below) and when the Go button flashes, press 'Go' on your machine.
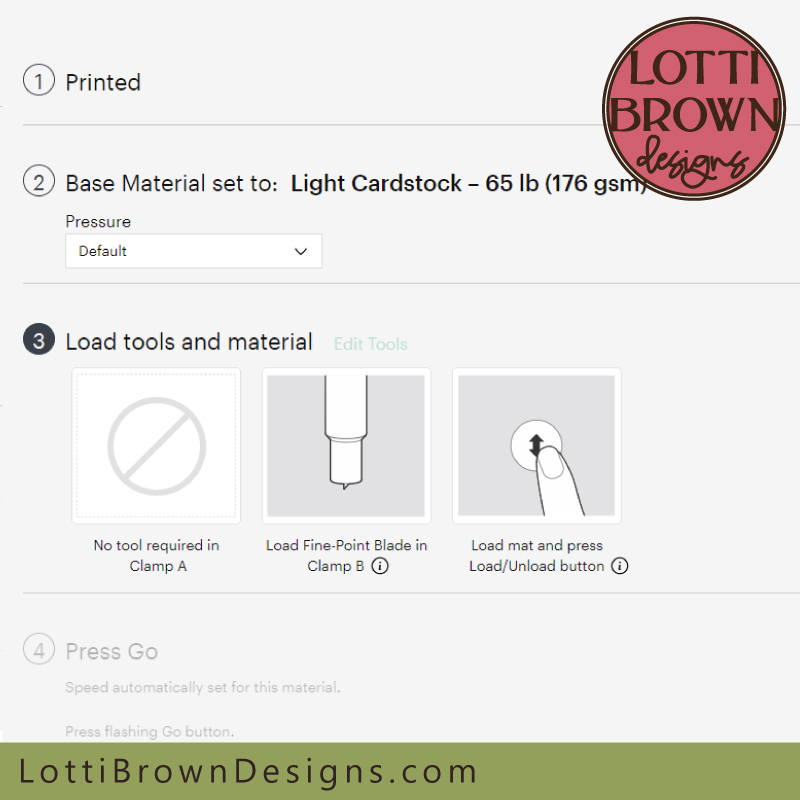 Load in your mat and press 'Go'
- Your Cricut will spend some time scanning the page - then it will cut the square. It should look something like mine in the image below...
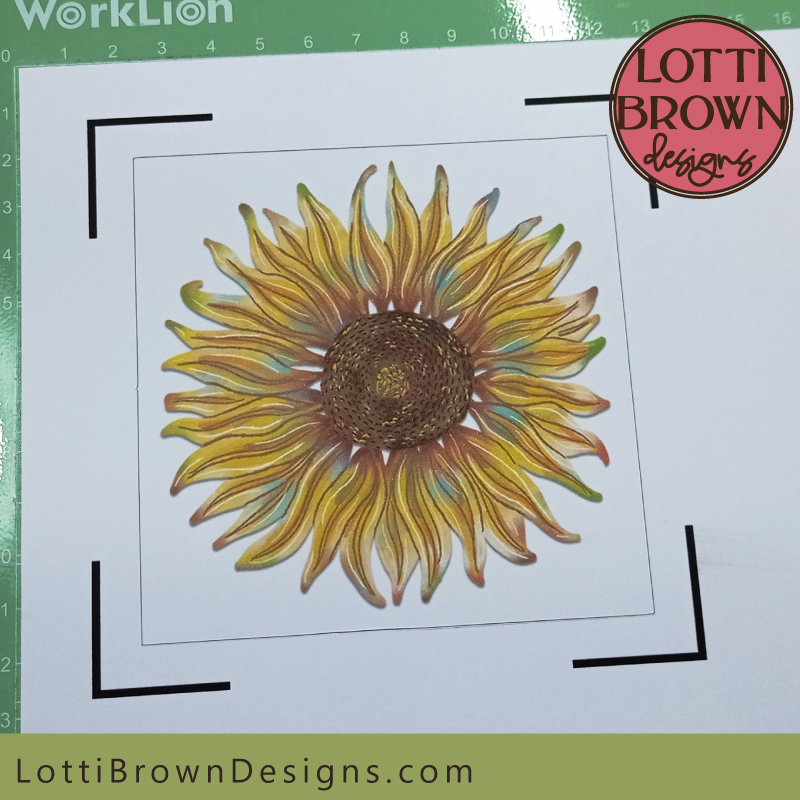 Using the print then cut function on Cricut
- You just need to peel the mat away from your paper and pop out the central square and your print and cut design is ready to be used for your project - see my image below...
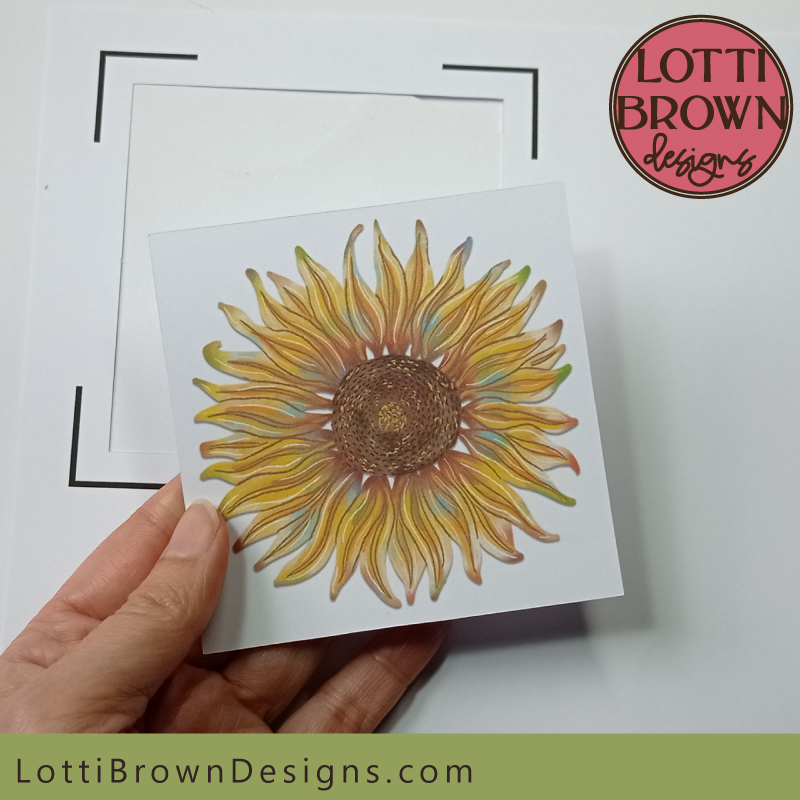 Pop out the square and it's ready to go!
- You can complete the Print Then Cut portion of the project by pressing 'Done' on your screen - and then we'll move onto the cutting and scoring phase of the project next...
P.S. If you're following these instructions from the Christmas ornaments page, go back to there now by following this link...
How to Cut & Score Your Card & Envelope
To open your card & envelope cut file in Cricut Design Space, go to:
- New Project
- Upload > Upload Image > Browse
- Locate your SVG file for the project and upload it
- Select it and 'Add to Canvas'
- Our first task is to 'Ungroup' the elements - click on the 'Group/Ungroup' icon (two little squares) as shown in the image below...
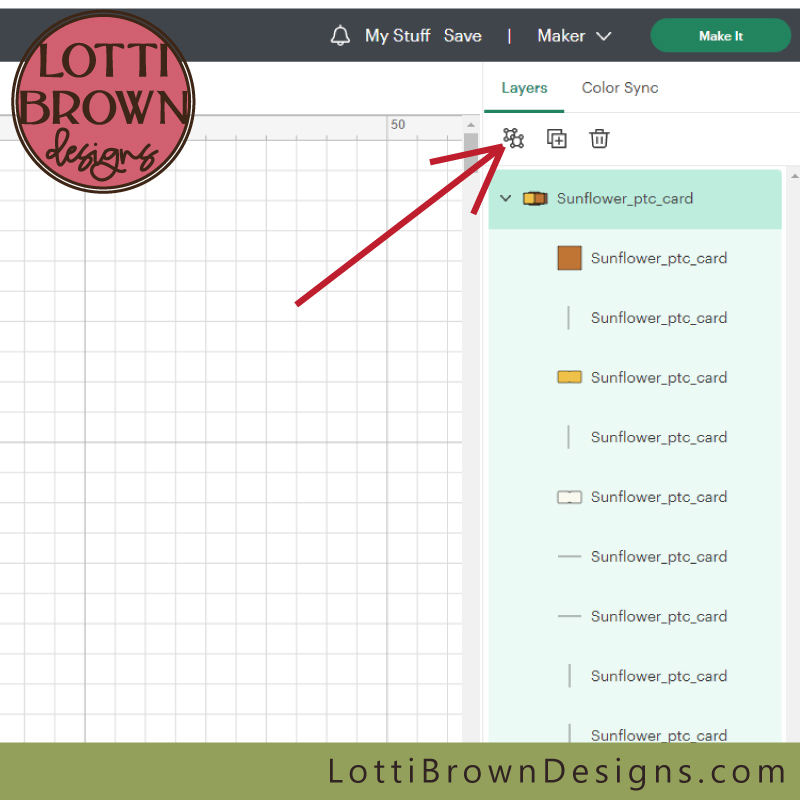 'Ungroup' the card elements
- All the elements should now appear separately as in the image below...
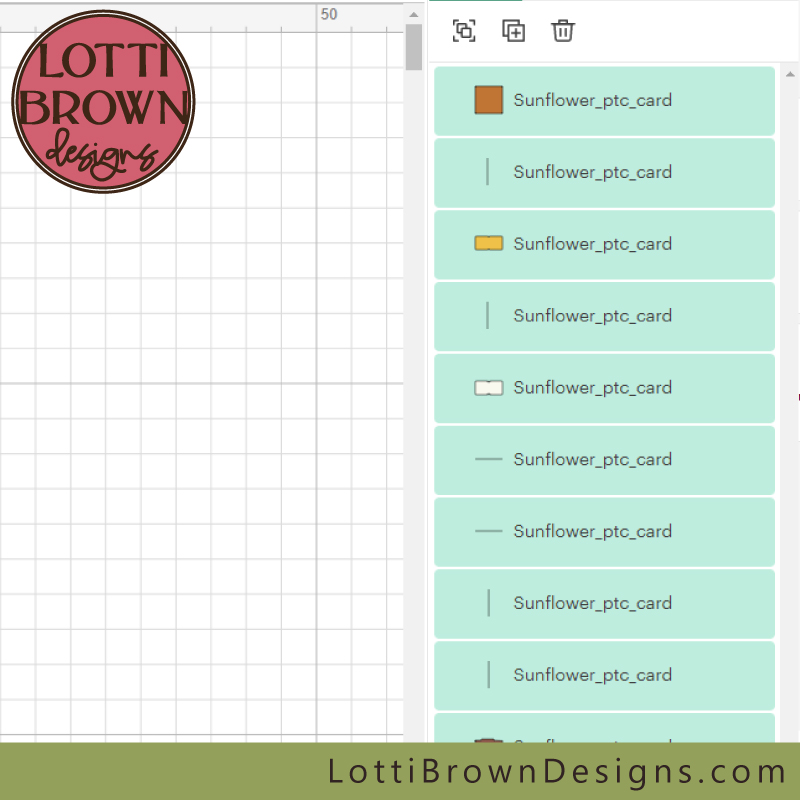 These are all now showing as 'Ungrouped'
- The next part of the instructions are a brief version of the instructions that I go into in more detail on this page. The process is exactly the same as on the more detailed instruction. The only difference is that you will have an extra topper square, which is on the very top of the layers...
- Whether you're following on on this page, or branching off to follow the detailed instructions, I think it's helpful (but not essential) just to 'hide' the topper square (using the eye symbol on the right, see image below) while we set up the score lines. It makes it a bit easier to keep everything straight. But it's also important to remember to 'unhide' it before we send the project to cut. If you stick to this page, I'll prompt you to do that. If you want the more detailed instructions, please do remember to do that, and also to come back here to follow the rest of the instructions for putting together the card (that bit's the easy bit!)...
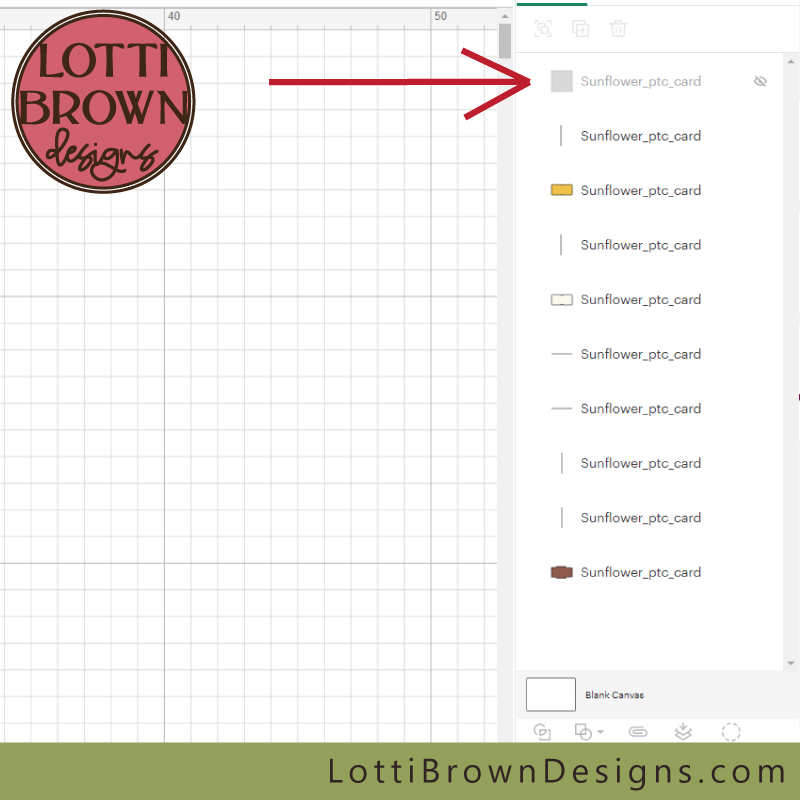 You can 'hide' the topper square if you like while we're setting up - but do also remember to 'unhide' it before sending your project to cut!
- Our next step is to select all the score lines - you can see these shaded green in the image below - the green colour means they're selected...
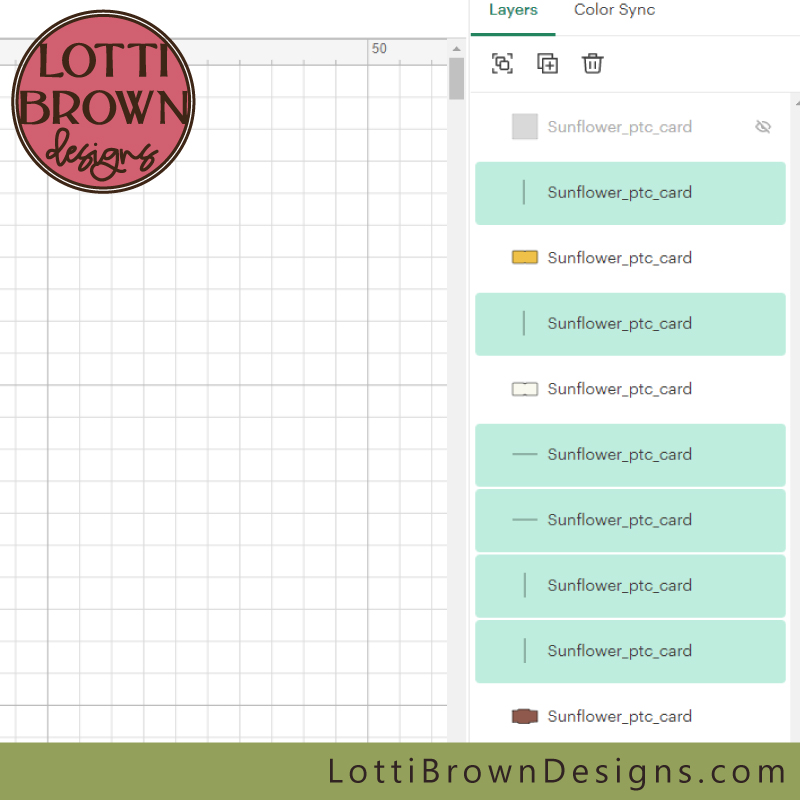 Select these lines shown, ready to set to score
- With all your score lines selected, go to 'Operation' (top left of screen) and use the drop down menu to set the operation to 'Score' - see the image below...
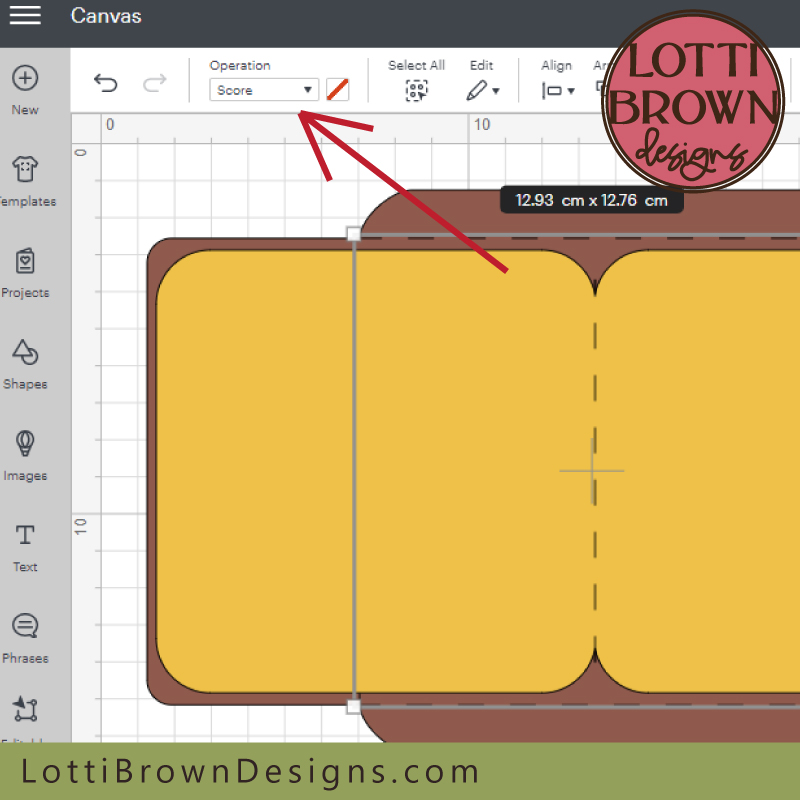 Set the 'Operation' to 'Score'
- Next, we need to 'Attach' each set of score lines to their relevant shape. The score lines are all positioned above their relevant shape in the layers panel on the right. So the outer card shape (yellow here) has one score line above it. The inner card shape (white here) has one score line above it. And the envelope shape (brown here) has four score lines above it.
- You need to select, for example, the outer card shape plus its score line just above - then press Attach (looks like a paper clip at the bottom of screen, below the layers). Then repeat for the inner card shape plus its score line just above it - 'Attach'. And again for the envelope shape with the FOUR score lines above it - 'Attach'. (Follow the detailed instructions here, if you're struggling.) When you're done, your screen should look something like mine in the two images below...
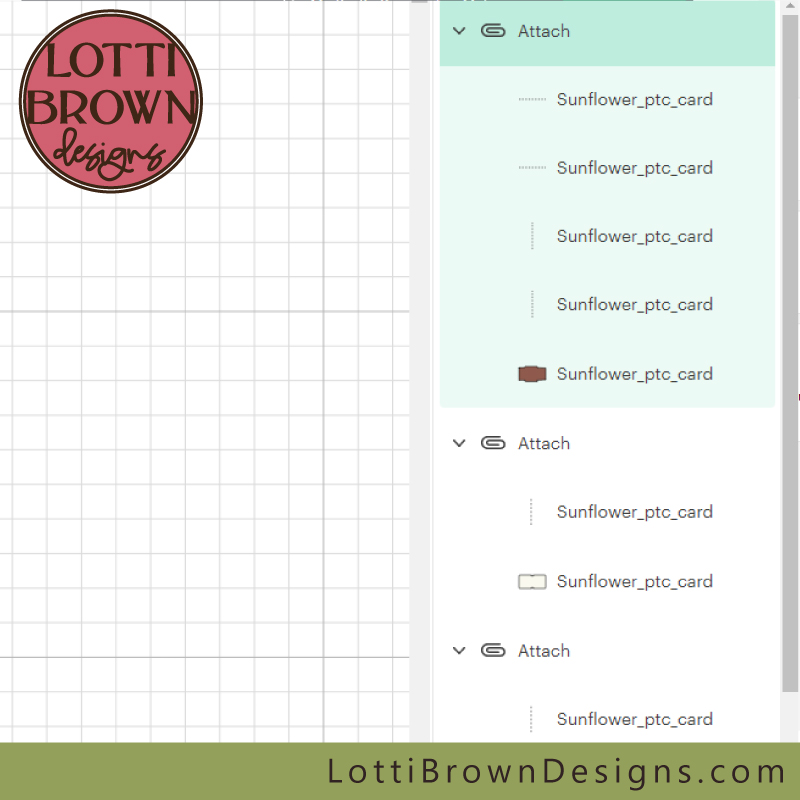 The score lines are now attached to their own relevant shape
- Remember we hid the topper square earlier so it wouldn't get confusing with our score lines and attaching. Well, now's the time to unhide it using the eye icon on the right. The square should now be right at the bottom of your layers - see the image below...
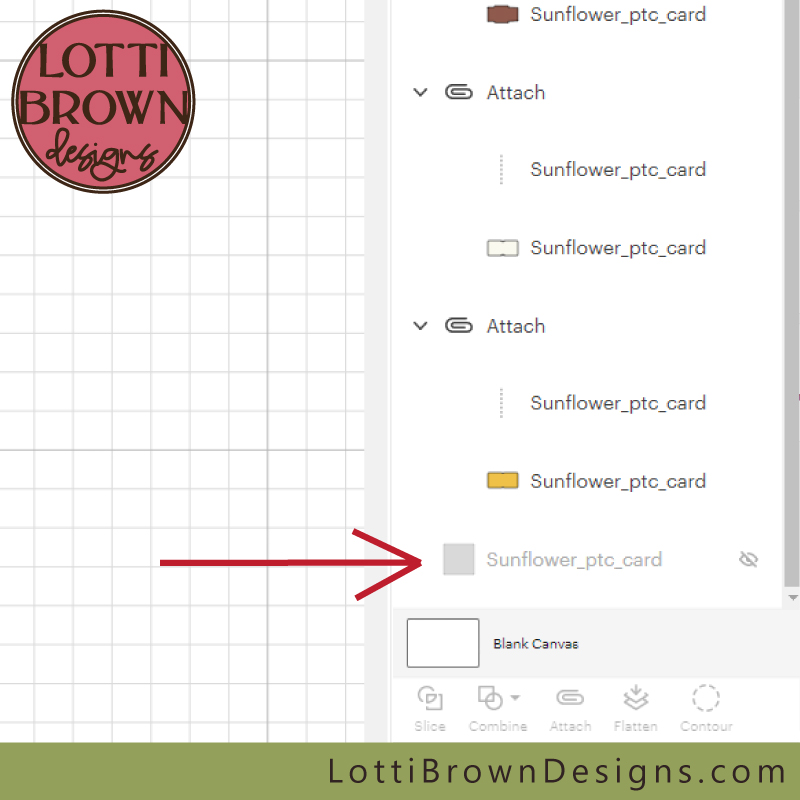 Unhide your topper square now by clicking on the little eye icon on its right
- Your screen should now look like this, below, with your bottom layer showing (after clicking 'unhide')...
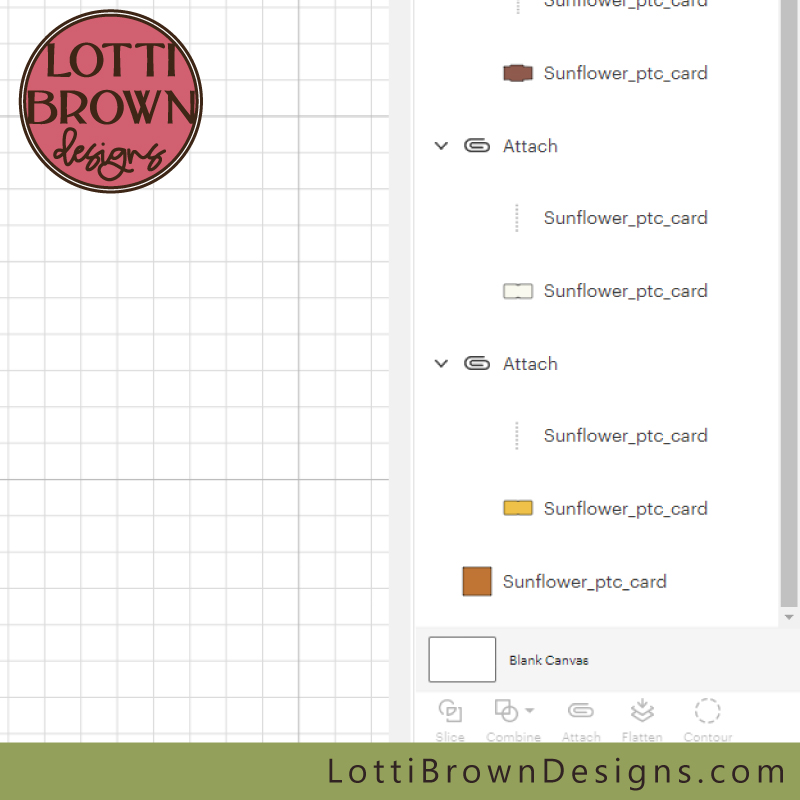 Your screen should now look like this
- Now, just click 'Make It' (top right) - see the image below...
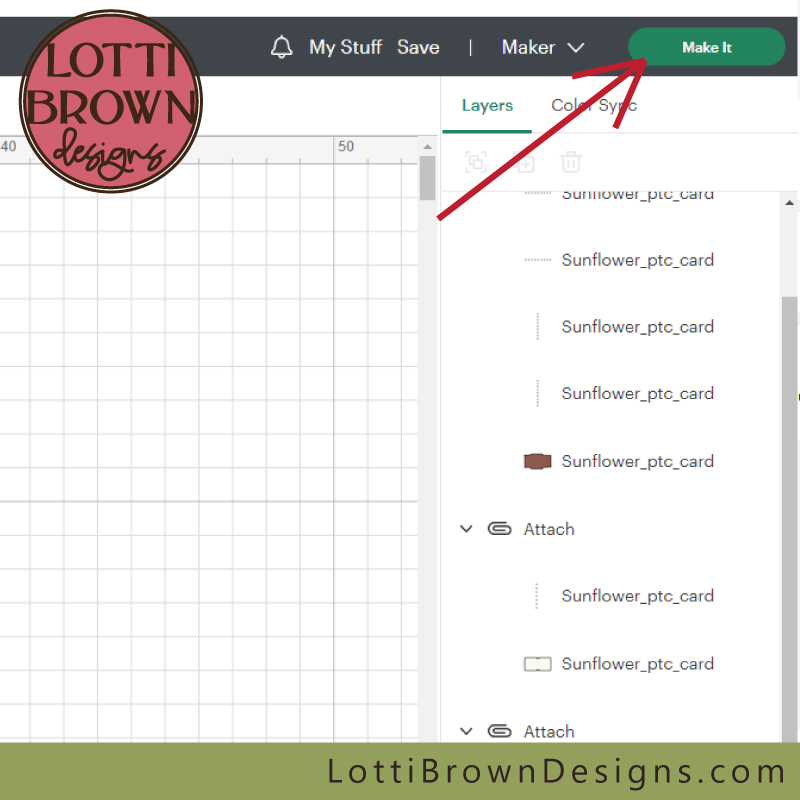 We're ready to 'Make It'
- We move onto the mats screen, and you can just do a final check that each of the mats has a cut and score element (the mat with the topper square will just show as Basic Cut as there is no scoring for that simple square shape) - see my image below...
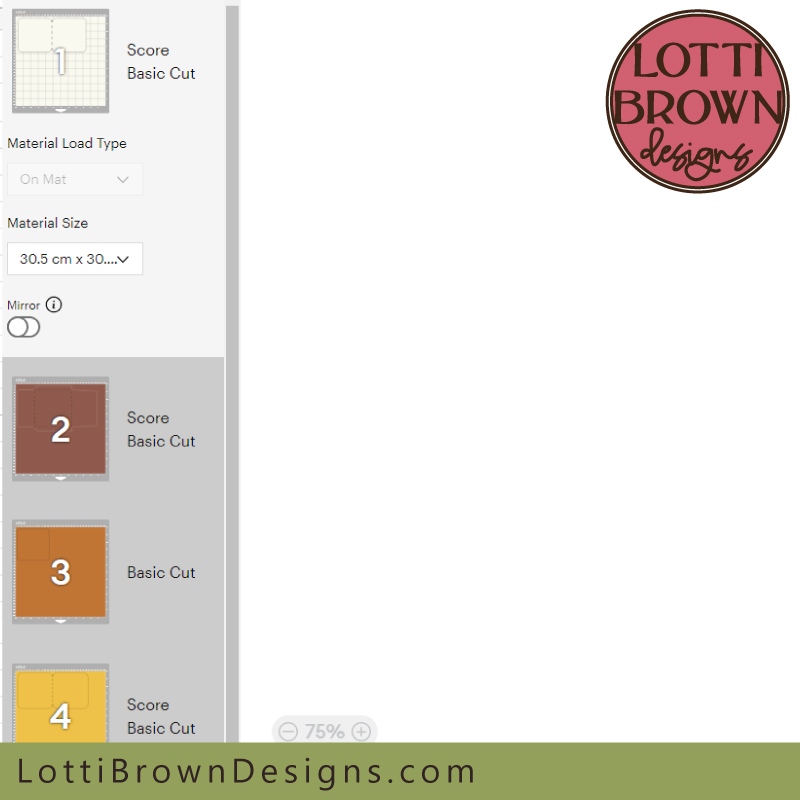 Final check
- Then just set your cardstock type each time, set your scoring tool type if necessary (and remember to actually put the tool into your machine), and send each mat to cut. If you need any extra help with this stage, please check the detailed instructions here...
- When everything is cut out and ready, we're ready to get to the final part and actually assemble the card. We'll move onto that just below...
Putting Together your Card & Envelope
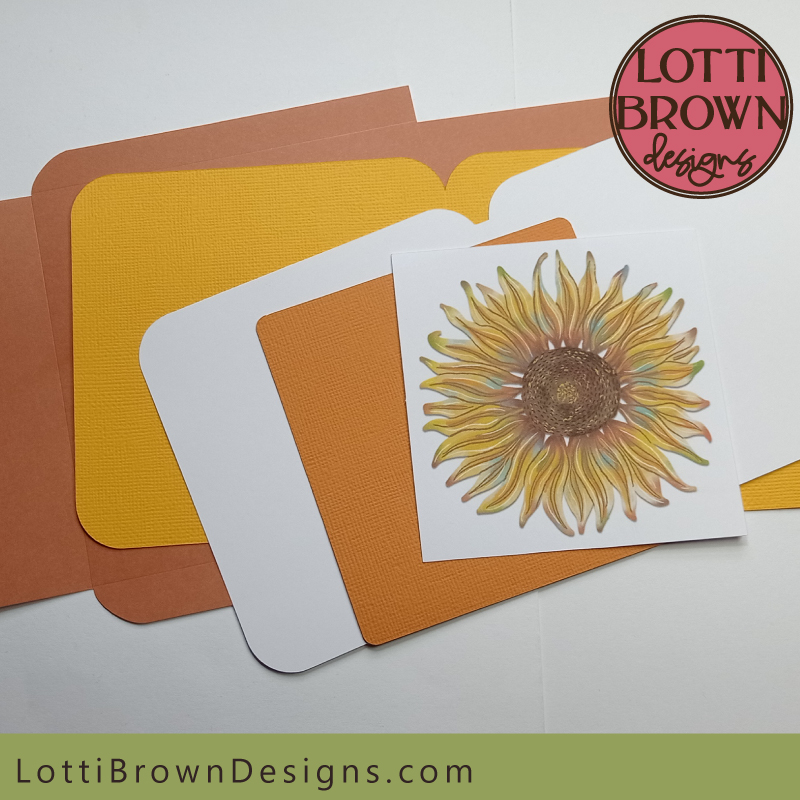 Making up your print and cut card - everything cut, printed, scored, and ready to go!
Folding and assembling your card and envelope will be pretty easy if you've made one of my cut out card templates before. If not, I have a detailed craft tutorial here showing exactly how to fold along all the score lines and where to glue to put everything together - the only extra bit you'll need is adding the design and the topper square - easy peasy!
You will need to:
- Use a metal rule to help you fold neatly along each of the score lines
- Glue your envelope with paper glue (optionally - leave an unopened double-sided sticky tape length along the closure, ready for when you want to seal it)
- Glue the inner card into the outer card (right hand side only)
- Glue the design onto the topper square
- Glue the topper square onto the card
I started by gluing the design onto the topper square. I just used a solid glue stick for this but made sure that I glued right up to the edges so that the design stuck down well and the corners or edges didn't flap up. See my image below...
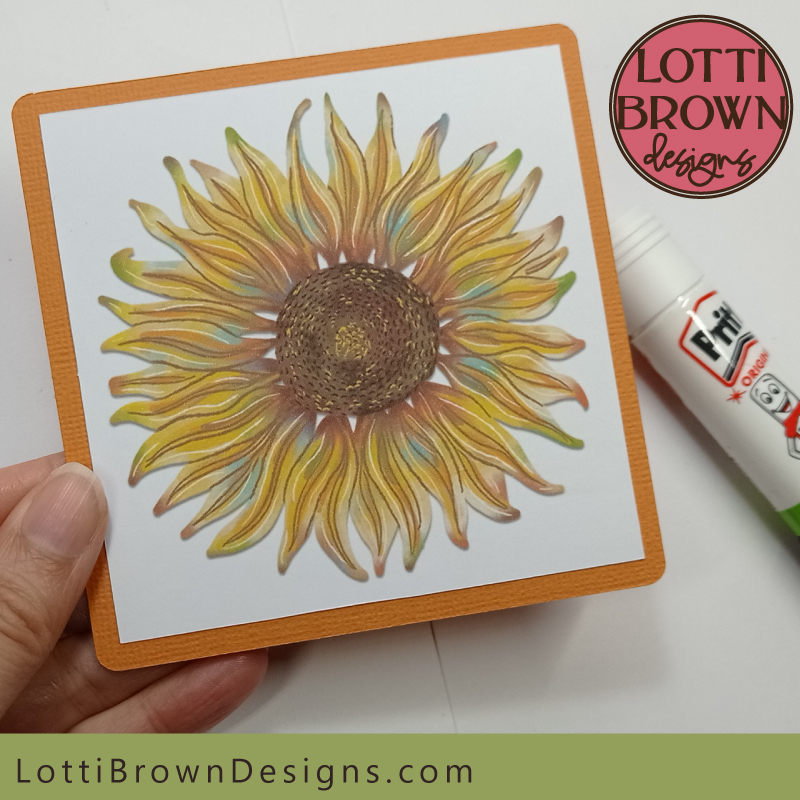 Glue the design onto the topper square
- Then fold and glue the envelope
- And fold the inner and outer card
- Then glue the inner card into the outer card (right hand side only) taking care to glue well, close to the folded edge (like you can see in the image below) - this is because this print and cut card with its added topper square is heavier than my cut-out card designs, and the front may open wider, so we want to make sure the inner card is glued well down along this fold.
I have detailed instructions for how to fold and glue the pieces, if you'd like, on this page - if you're not already familiar with my way of making cards, I do recommend you go through it, or you can just choose to refer to it if you feel stuck, if you prefer...
When you're done, come back here and we can add the topper square onto the card together...
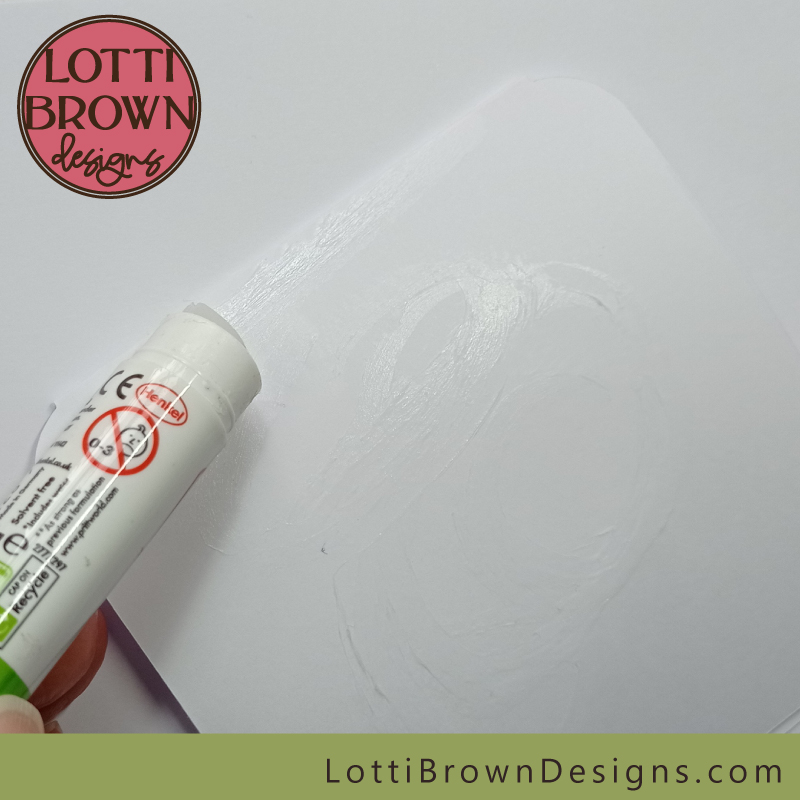 Add glue close to the folded edge on the inner card so that it sticks down well along this edge
- When you've made your envelope, and glued your inner card inside your outer card, we can now give the final touch to our card and add the topper square with the print then cut design...
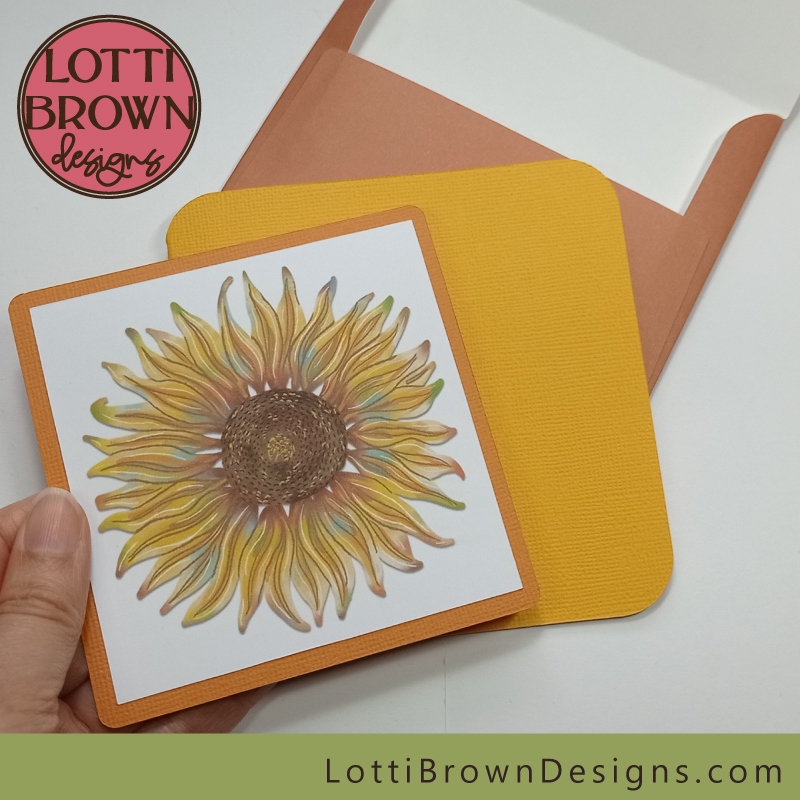 Ready to add the topper square
- It's super easy - just glue it on, making sure that you glue close to the edges to make sure it doesn't flap about - see the image below...
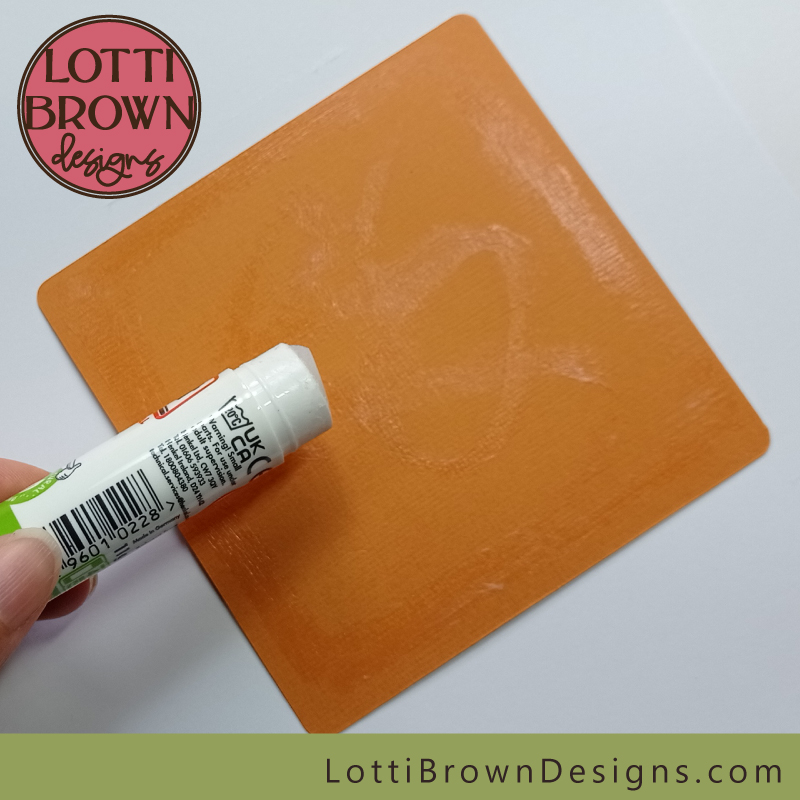 Add glue right to the edges of the topper square
- And carefully glue it in place trying to get it fairly even and in the centre! Here's mine in the image below...
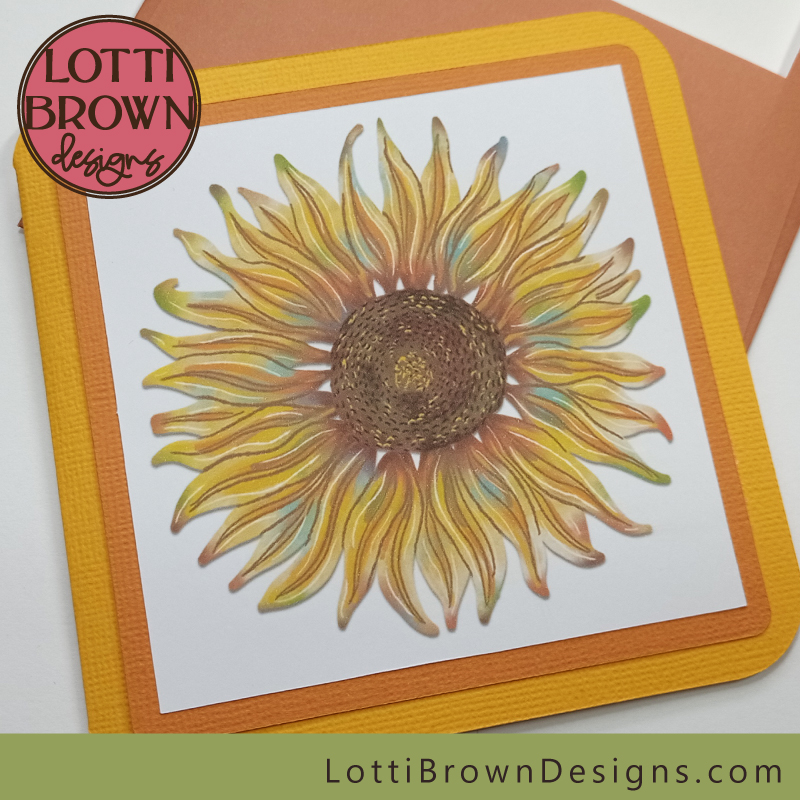 My completed print then cut sunflower card
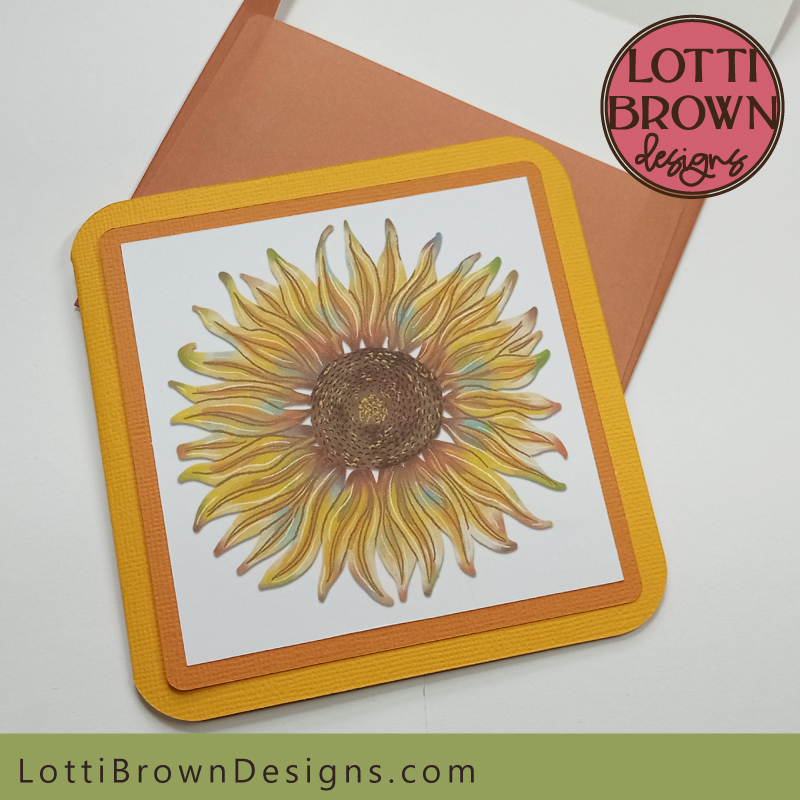 A cheerful hand-made card, ready to send!
I hope you've enjoyed my print and cut on Cricut card project!
- If you like the sunflower card design, you can get that in my store here...
- The link for the detailed instructions for setting up the score lines for the basic card & envelope in Cricut Design Space is here...
- The link for the detailed instructions for folding and gluing the basic card and envelope is here...
- My test of different paper and cardstock types for printing onto is here...
- If you want to see more of my print and cut card templates, they're all on this page...
 More print and cut card templates!
You Might Also Like:
Lotti Brown's Designs & Templates
How-tos...
- How to use SVG cut files for Cricut (also other cut file formats & machines)
See all my card templates for your Cricut (or similar cutting machine) here - lots of ideas for birthdays, Christmas, and loads of other occasions - I'm adding more all the time!
Shall we stay in touch..?
Each month, I share stories from my own nature journal, new art from my studio, and simple seasonal inspiration to help you feel more connected with the turning year...
Recent Articles
-
December Berries Folklore in Britain - Rosehips, Holly and Haws
Dec 24, 25 04:35 AM
Explore December berries folklore in Britain - rosehips, haws, holly, ivy and sloes - with seasonal nature notes, birdlife, and quiet winter magic. -
Birch Tree Symbolism, Myth, and Folklore
Dec 23, 25 04:19 AM
Explore birch tree symbolism, myth, meaning and folklore as part of my Celtic Tree Calendar art project... -
British Nature Folklore Library: Stories, Seasons & Celtic Tree Wisdom
Dec 01, 25 05:09 AM
Explore British nature folklore, Celtic tree meanings, and seasonal wildlife stories. A growing library of myth, meaning, and hand-drawn inspiration.
Follow me:
Share this page:

